
Ever wonder why your coffee tastes amazing one day but bitter or weak the next? The secret lies in a few simple adjustments. Here's how you can make every cup taste better:
- Use fresh, whole beans: Coffee loses 70% of its aroma within 8 days of roasting. Buy small batches with a roast date and store them in an airtight, opaque container.
- Match grind size to your brewing method: Coarse for French press, medium for drip or pour-over. A burr grinder ensures consistency.
- Weigh your coffee and water: Use a digital scale for precise measurements. Start with a 1:16 coffee-to-water ratio.
- Heat water to 195–205°F: This range extracts flavors without bitterness. Preheat your equipment for stability.
- Invest in quality tools: A burr grinder, gooseneck kettle, and digital scale make a big difference.
- Master the pour-over method: Control your pour speed, bloom phase, and brew time for a balanced cup.
- Adjust brew time and stirring: Small tweaks can fix sourness or bitterness.
How To Make The Best Coffee At Home
sbb-itb-ed7145d
Tip 1: Buy Fresh, Quality Coffee Beans
If you want to take your home coffee game to the next level, start with freshly roasted coffee beans that clearly display a roast date. Why is this so important? Freshly roasted beans lose about 70% of their aromatic compounds within just eight days. By the two-week mark, the flavor noticeably declines, and after a month, you're left with coffee that tastes flat - almost like cardboard [4][11][10].
The main culprit behind this rapid flavor loss is oxygen. Believe it or not, just 70 cubic centimeters of air exposure can make a one-pound bag of coffee stale [1]. This is why the roast date is the most critical detail on a coffee bag - not the expiration date. If you don’t see a roast date, chances are the beans are already past their prime. High-quality roasters often go a step further, sharing details about the farm or region where the beans were sourced, reflecting their commitment to quality and transparency.
Another essential tip: always buy whole beans instead of pre-ground coffee. Grinding exposes more surface area to air, which speeds up the loss of essential oils - the very compounds that make your coffee flavorful and aromatic.
When it comes to storage, follow these guidelines to preserve your beans:
- Use an airtight, opaque container (ceramic or glass containers work best) and store it in a cool, dark cabinet.
- Avoid storing beans on the counter or in the refrigerator, as exposure to light, heat, and moisture can degrade their quality.
- If you absolutely need to freeze beans for long-term storage, keep them sealed in their original bag and avoid thawing and refreezing. Condensation can harm the oils that are vital for flavor.
"The best way to store coffee is to store it in the bag it comes in."
– Erika Vonie, Director of Coffee, Trade [11]
Lastly, buy only what you can use within one to two weeks. Smaller quantities ensure you’re always brewing with beans at their peak freshness.
Once you’ve chosen and properly stored your beans, the next step is matching the grind to your brewing method.
Tip 2: Match Your Grind Size to Your Brewing Method
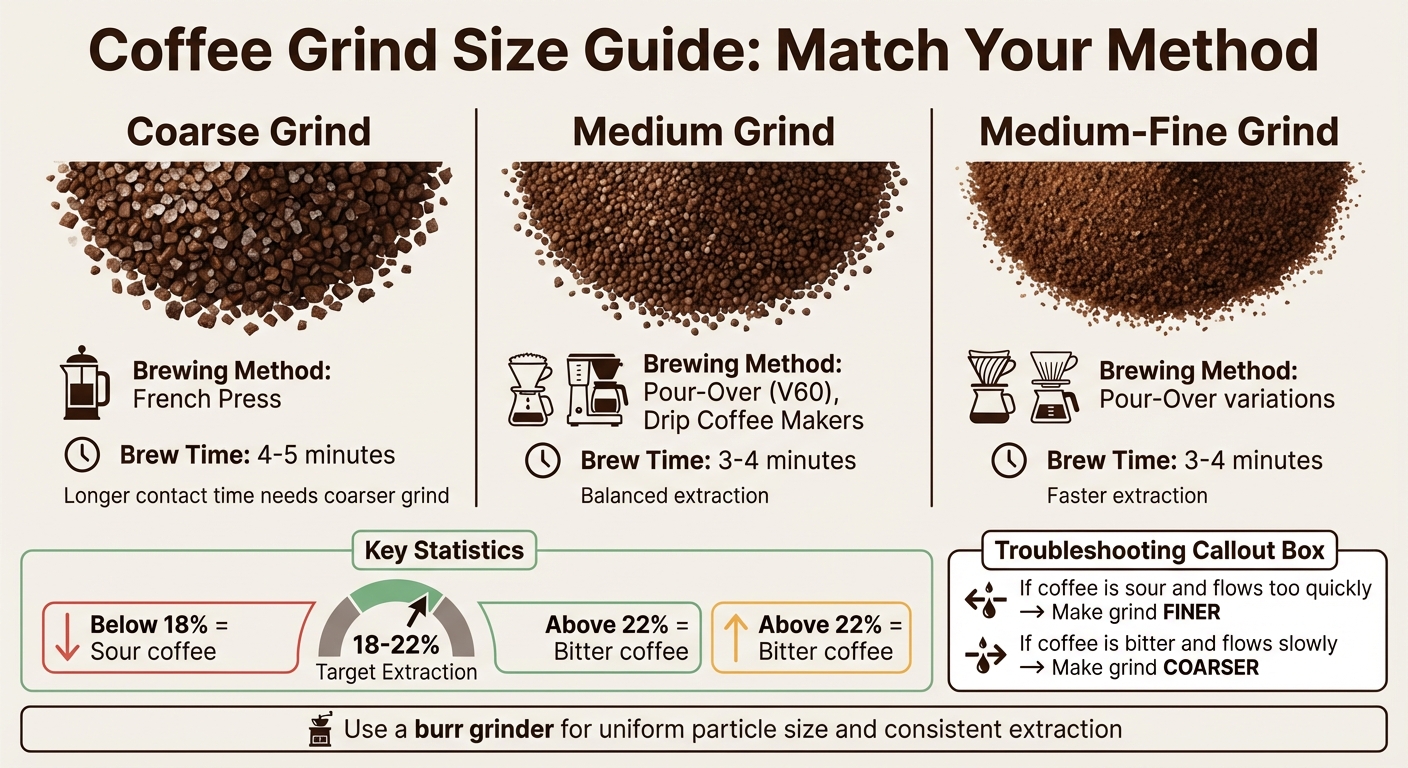
Coffee Grind Size Guide by Brewing Method
Getting the grind size right is a game-changer for brewing delicious coffee at home. When you grind coffee beans, you expose more surface area, which speeds up how water extracts flavors. Finer grinds extract faster but can lead to over-extraction (and bitterness), while coarser grinds extract slower, risking under-extraction (and sourness).
The sweet spot? Aim to extract 18–22% of the coffee’s soluble material. Falling below 18% gives you sour coffee, while going over 22% makes it bitter [13]. Essentially, your grind size controls how quickly flavors are drawn out.
Here’s a general rule: brewing methods with shorter contact times need finer grinds, while those with longer contact times work better with coarser grinds [13][14]. For instance:
- French press: Since it steeps for 4–5 minutes, a coarse grind - similar to sea salt or breadcrumbs - works best.
- Pour-over (like V60): A medium grind, with a texture like table salt, delivers the best results.
- Drip coffee makers: Typically require a medium to medium-fine grind for optimal flavor.
If your coffee isn’t hitting the mark, tweak the grind size based on taste. As Temple Coffee Roasters suggests:
"If the coffee is sour and flows too quickly, make the grind size finer. If the coffee tastes bitter and flows slowly, make the grind size coarser."
[14]
Also, invest in a burr grinder instead of a blade grinder. Burr grinders give you uniform particle sizes, which help ensure even extraction. Blade grinders, on the other hand, create an uneven mix of tiny "fines" and larger chunks, leading to inconsistent flavors. And don’t forget - grind the beans right before brewing to lock in freshness [6].
Once you've mastered grind size, the next step is nailing precise measurements for your perfect cup.
Tip 3: Measure Coffee and Water Precisely
Guessing your measurements? That’s one way to ruin a great cup of coffee. Considering brewed coffee is about 98%–98.5% water [3], nailing the coffee-to-water ratio is absolutely key.
Here’s the issue with using scoops or tablespoons: coffee beans aren’t all the same. Their density changes depending on their origin and roast level. For example, a scoop of light roast coffee weighs around 5 grams, while a scoop of dark roast tips the scale at about 8 grams - a whopping 60% difference [3]. This inconsistency makes it nearly impossible to brew the same cup twice.
The solution? A digital scale. Start with a 1:16 coffee-to-water ratio for pour-over or drip brewing methods [15]. If your coffee tastes too weak, bring it down to 1:15. Too strong? Try 1:17 or even 1:18. These guidelines align with the Specialty Coffee Association's Gold Cup Standard [15].
Using a precision scale (like one from Fwing Coffee) is simple. Place your brewing device on the scale, hit the tare button, and then measure both your coffee and water by weight [15].
"Weighing coffee gives you consistency regardless of variety or roast level and better control over your coffee." – Counter Culture Coffee [3]
Once you’ve mastered the measurement game, the next step is fine-tuning your water temperature for the perfect extraction.
Tip 4: Heat Water to 195–205°F
Once you've nailed your measurements, the next big player in brewing coffee is water temperature. It’s not just a minor detail - it’s the key to unlocking the flavors in your cup.
The Specialty Coffee Association recommends a brewing range of 195°F to 205°F (90.5°C to 96°C) [17]. This range is perfect for dissolving the good stuff - like sugars and acids - while steering clear of those bitter, heavy compounds [7]. Go hotter than 205°F, and you risk over-extraction, which can leave you with a cup that's bitter, astringent, or even smoky [16]. On the flip side, water cooler than 195°F might under-extract your coffee, leaving it weak, watery, or unpleasantly sour [16].
Here’s a pro tip: when you pour water from your kettle into the brewing vessel, it usually cools by about 10°F [7]. To compensate, start with water that’s around 205–210°F, so you end up brewing at an ideal temperature of about 200°F. Preheating your brewing equipment - like rinsing your filter and dripper with hot water - can also help keep the temperature stable during the process.
For precision, a variable-temperature gooseneck kettle (like the one from Fwing Coffee) is your best friend. It lets you set and maintain the exact temperature during your 3- to 4-minute pour. No fancy kettle? No problem. Boil your water and let it cool for about 30–45 seconds to hit the sweet spot. Adjust based on your roast: light roasts thrive at the higher end of the range (near 205°F) to bring out their natural sweetness, while dark roasts do better closer to 195°F to avoid harsh, overbearing flavors [7].
"Brewing in that sweet spot will bring out the sweetness and complexities of our coffees without extracting the unnecessary bitter flavors." – Caffe Luxxe [4]
Tip 5: Use Quality Brewing Equipment
Once you've nailed the right measurements and brewing temperature, the next step is investing in quality equipment. Good tools can make all the difference, ensuring consistent results and bringing out the best flavors in your coffee.
A burr grinder is the cornerstone of any coffee setup. Unlike blade grinders, which create uneven grounds, burr grinders produce uniform particles, leading to more consistent extraction. If you're just starting out, consider models like the Baratza Encore (around $150) or the OXO Brew (around $100), both of which deliver reliable performance.
"Arguably the most critical piece of equipment you can add to your delicious coffee toolbox is a quality burr grinder." – Counter Culture Coffee [3]
Other essentials include a gooseneck kettle and a digital scale, which help you control water flow, maintain temperature, and measure precisely - key factors for a balanced brew. For top-notch performance, electric variable-temperature kettles like the Fellow Stagg EKG (priced between $180 and $200) are excellent. If you're on a budget, the Bonavita gooseneck kettle (around $56) offers great control without breaking the bank.
Don't overlook the importance of using clean, mineral-rich water. A simple carbon filter can remove chlorine and odors, but avoid distilled water - it lacks the minerals needed for proper flavor extraction. Also, preheat your equipment by rinsing your filters and warming your brewer with hot water. This step helps maintain a stable brewing temperature, which is crucial for achieving the best results.
Pour-Over vs. French Press: A Quick Comparison
| Feature | Pour-Over (e.g., Hario V60, Kalita Wave) | French Press |
|---|---|---|
| Flavor Profile | Clean and bright; highlights acidity and delicate fruit and floral notes | Bold, heavy-bodied, with rich textures from retained oils |
| Brew Time | About 3–4 minutes | About 4–5 minutes |
| Ease of Use | Moderate; requires technique and a gooseneck kettle | Easy; simple immersion method |
| Filter Type | Paper (removes oils and sediment) | Metal mesh (allows oils and some fines through) |
| Cost | Around $25–$50 for a dripper | Around $30–$40 |
Whether you prefer the clean, nuanced flavors of a pour-over or the bold richness of a French press, having the right equipment ensures every cup meets its full potential.
Tip 6: Learn the Pour-Over Method
The pour-over method gives you full control over every step, resulting in a clean, well-balanced cup that brings out the unique flavors of your coffee. While it demands a bit more focus than other brewing methods, once you grasp the process, it becomes second nature.
Start by heating filtered water to a temperature of 195–205°F (or 210°F for light roasts). Grind your coffee beans to a medium-fine texture, similar to sea salt or raw sugar. Place a quality filter in your dripper, rinse it thoroughly with hot water to eliminate any papery taste and to warm the brewing vessel. Discard the rinse water, add your coffee grounds, and level them evenly. Then, begin with the bloom phase to prepare the coffee for an even extraction.
The bloom phase is crucial. Pour just enough water - roughly two to three times the weight of your coffee grounds - to saturate them completely. For instance, if you're using 30 grams of coffee, pour about 60–90 grams of water. Let it sit for 30–45 seconds as the coffee releases trapped carbon dioxide. This step is essential for preventing sourness and ensuring the water can evenly extract the coffee's flavors.
"Desirable and tasty solubles dissolve in water more readily than the unpleasant-tasting substances, so getting a tasty brew is all about stopping the brewing at the perfect moment" [7].
For the main pour, use a gooseneck kettle (such as those from Fwing Coffee) to control the water flow. Pour slowly in concentric circles, starting from the center, moving outward, and then back inward. Keep the kettle spout about 8–10 inches above the grounds, and avoid pouring directly onto the filter. The entire brewing process - from the bloom to the final drip - should take about 3–4 minutes. A flat coffee bed with no peaks or dips at the end is a good indicator of proper technique. As Starbucks notes:
"a sign of a proper brewing technique" [18].
If your coffee tastes sour, try using a finer grind or slightly hotter water. If it’s too bitter, opt for a coarser grind or reduce the brewing time. Once your technique feels solid, you can experiment further with brew time and stirring to refine your cup.
Tip 7: Adjust Brew Time and Stirring
Once you've nailed the basics of coffee brewing, tweaking the brew time and stirring can take your cup to the next level. These small adjustments help you fine-tune the flavor, ensuring you get the most out of your beans. The goal? Extract the acids and sugars for a balanced taste while stopping before any bitterness creeps in.
Start by using a timer to track your brew from the moment water touches the coffee grounds until the last drip. For pour-over methods, aim for a total brew time between 3 and 4 minutes. If your brew finishes in under 2.5 minutes, the result might taste thin or sour. On the other hand, exceeding 5 minutes often leads to a harsh, bitter flavor [7]. Tools like the Fwing Coffee timer can be helpful for establishing a baseline. Once you have that, you can experiment with one variable at a time to find your ideal balance.
Stirring is another key factor in achieving even extraction. Think of it like stirring sugar into a drink - it speeds up the process. During the bloom phase, a gentle swirl ensures all the grounds are evenly saturated, preventing channeling (where water flows unevenly through the coffee bed) [7][9]. For French press users, at the 4-minute mark, break the crust of grounds floating on top and skim off the foam before pressing [2][9]. If you're using a pour-over, a light stir or swirl after the final pour helps the remaining water flow evenly through the filter [8][9].
If your coffee tastes overly bitter, try cutting down the brew time or reducing how much you stir. If it’s too sour or weak, a longer brew time or a bit more stirring might help boost the extraction [12]. Keeping notes on your times and adjustments for different beans will make it easier to replicate your perfect cup every time.
Conclusion
Making better coffee at home starts with mastering a few key basics. The foundation of a great cup lies in using fresh, high-quality beans. From there, it’s all about precision: matching your grind size to your brewing method, measuring coffee and water by weight, heating water to a precise 195–205°F range, and relying on reliable tools like burr grinders and gooseneck kettles. These steps work together to control extraction, helping you avoid the sourness of under-extraction or the bitterness of over-extraction [19]. Every detail - from selecting the right beans to perfecting your timing - plays a role in crafting a balanced and flavorful brew.
By following these seven practical tips, you can remove the guesswork from your coffee-making routine. Using a digital scale to maintain a 1:15 to 1:17 coffee-to-water ratio and timing your brew for 3 to 4 minutes ensures consistency in every cup [1][5]. These straightforward techniques are designed to tackle common brewing issues and elevate your daily coffee experience.
The right tools make all the difference. As mentioned earlier, Fwing Coffee offers a range of thoughtfully designed brewing equipment, including precision grinders, kettles, pour-over setups, and French presses. Built with durability and ease of use in mind, their products help you focus less on troubleshooting and more on savoring the complex, balanced flavors in your beans. Incorporate these techniques and tools into your routine, and you’ll enjoy café-quality coffee from the comfort of your home every day.
FAQs
What’s the best way to keep coffee beans fresh at home?
To maintain the freshness of your coffee beans, keep them in an airtight container, ideally one that's vacuum-sealed. Store this container in a cool, dark, and dry location, away from heat, sunlight, and moisture. Steer clear of refrigerating or freezing your beans, as this can lead to unwanted moisture exposure and gradually compromise their flavor.
For optimal flavor, grind only the amount of coffee you need right before brewing. Whole beans retain their freshness much longer than pre-ground coffee, ensuring a consistently better-tasting cup every time.
What is the best water temperature for brewing coffee at home?
The ideal water temperature for brewing coffee falls between 195°F and 205°F, just shy of boiling. This range ensures you extract the right balance of flavors from the coffee grounds, avoiding bitterness or weak, under-extracted coffee.
To hit this sweet spot, bring your water to a boil and let it cool for about 30 seconds before brewing. If you want to make things easier and more precise, consider using a thermometer or an electric kettle with temperature control. Getting the water temperature right is a small but essential step to take your home coffee game to the next level!
What makes a burr grinder better than a blade grinder?
A burr grinder is a favorite among coffee lovers for one key reason: it delivers a consistent grind size. Unlike blade grinders that chop beans unevenly, burr grinders use two burrs to crush the beans, producing uniform grounds. This even grind is essential for extracting flavors properly, resulting in a smoother, more balanced cup of coffee.
Another advantage of burr grinders is their precision. You can fine-tune the grind size to suit different brewing methods, whether you're making pour-over, French press, or espresso. While burr grinders tend to have a higher price tag, their ability to enhance flavor and provide consistent results makes them a smart choice for anyone serious about their coffee.