
Brewing coffee at home can save you money, give you complete control over your cup, and deliver better-tasting results than most cafés. With just a few tools - a burr grinder, digital scale, and a brewing method like a French Press or pour-over - you can create coffee tailored to your preferences. Here's what you need to know:
- Why Brew at Home? Save money, avoid café lines, and enjoy fresher, more flavorful coffee.
- Essential Equipment: Burr grinder (for consistent grounds), digital scale (for precise ratios), and the right kettle or brewer.
- Choosing Beans: Opt for whole beans, store them properly, and experiment with roast levels.
- Brewing Basics: Master grind size, coffee-to-water ratios, and water temperature for balanced extraction.
- Beginner Methods: French Press, pour-over, automatic drip machines, and cold brew are great starting points.
Follow these steps to start brewing coffee at home that’s rich, smooth, and made exactly how you like it. No barista skills required.
Home Coffee Brewing 101: Methods, Equipment, and Tips for the Perfect Cup
Basic Equipment You Need to Get Started
Starting your home brewing adventure doesn’t require a mountain of gear - just a few key tools to get you going. As your skills improve, you can always expand your setup.
First up, a burr grinder is a must-have. Unlike blade grinders that hack at the beans unevenly, a burr grinder ensures consistent grounds, which is crucial for even extraction and avoiding unpleasant flavors [3].
"The grinder is the singular piece of coffee equipment you can't skimp on, no matter what." - Clive Coffee [1]
Next, you’ll need a digital scale to measure your coffee and water by weight for consistent results. For beginners, the OXO Brew Precision Scale (about $45) offers reliable accuracy, while the Jennings CJ4000 is a solid, budget-friendly pick [3].
When it comes to kettles, your brewing method will guide your choice. Pour-over fans will appreciate a gooseneck kettle like the Hario V60 Buono or the Fellow Stagg EKG (priced between $180–$200) for precise water flow control. If you’re using a French Press or AeroPress, a standard kettle will do the job just fine.
Choosing Coffee Beans and How to Store Them
Using whole beans is non-negotiable for the best flavor. Pre-ground coffee loses about 60% of its aroma within just 15 minutes [9]. To keep things fresh, buy whole beans weekly from local roasters and aim to use them within a few weeks of roasting [12].
Proper storage is just as important. Keep your beans in airtight, opaque containers like the Airscape or Fellow Atmos, and store them at room temperature. Avoid the fridge or freezer - moisture and odors can ruin the beans [13]. If you’re just starting out, medium roasts are a great choice. They offer a balanced flavor that’s forgiving as you experiment with brewing techniques.
Coffee Grinders: Getting the Right Grind Size
The size of your coffee grounds can make or break your brew. If the grind is too coarse, your coffee will taste weak and sour; too fine, and it’ll turn bitter from over-extraction [10]. Here’s a quick guide: coarse grinds resemble fine gravel (perfect for French Press), medium grinds look like coarse sand (ideal for drip coffee), and fine grinds have the texture of table salt (great for pour-over) [5].
For electric burr grinders, consider budget-friendly options like the De'Longhi KG79 or the highly praised Baratza Encore. If you prefer manual grinders, the Hario Mini Mill Plus delivers consistent results [5][10].
"Consistency of the grounds will impact how well your coffee extracts... too coarse and the coffee will taste watery and sour, too fine and you'll be left with an unpleasant bitter taste." - Natalie Bass, BBC Good Food [10]
Match your grind size to your brewing method: coarse for French Press, medium-fine for pour-over. Once you’ve got that down, you’re set to try out some beginner-friendly brewing styles.
Beginner-Friendly Brewing Methods
Here are a few brewing methods that are perfect for beginners:
- French Press: An immersion method where coffee grounds steep in water for 4–5 minutes, creating a rich, full-bodied cup.
- Pour-over: Using drippers like the Hario V60 or Kalita Wave, this method involves slowly pouring hot water over coffee grounds, taking about 2.5–4 minutes.
- Automatic Drip Coffee Makers: These are straightforward and convenient - just add water and coffee, press start, and you’ll have a cup ready in 4–5 minutes.
- Cold Brew: One of the easiest methods, this involves steeping medium-fine to coarse grounds in room-temperature water for 8–12 hours, then filtering [11].
Kettles, Scales, and Other Accessories
A few extra steps can elevate your coffee game. For instance, rinsing paper filters with hot water removes any papery taste and preheats your brewing vessel [12]. If you’re using a metal filter, like in a French Press, expect a fuller-bodied cup since more oils make it through [2].
Water temperature is another crucial factor. Aim for 195°F to 205°F for proper extraction [7]. While electric kettles with variable temperature settings make this easy, you can also use a standard kettle and thermometer when starting out.
Finally, use filtered tap water or add minerals to distilled water for the best extraction results [6][1].
Fwing Coffee Tools and Accessories

To make your brewing journey even smoother, Fwing Coffee offers a curated selection of tools tailored for beginners. Their lineup includes pour-over brewers, burr grinders, gooseneck kettles, and precision scales - all designed to help you achieve consistent, great-tasting coffee from the start.
Fwing Coffee also provides fresh beans, mugs, drinkware, and frothers to round out your home coffee station. Each product is thoughtfully designed to help you build confidence as you refine your brewing skills.
Whether you’re starting with a French Press or diving into pour-over techniques, Fwing Coffee’s tools are built to last, so you can enjoy exceptional coffee without constantly upgrading your equipment.
How to Choose the Right Coffee Beans
Selecting the right coffee beans is the foundation of brewing great coffee at home. With so many options available, from roast levels to origins, it can feel overwhelming. But understanding a few basics can simplify the process and help you find the perfect beans for your taste.
Let’s start by diving into how roast levels impact flavor and caffeine content.
Light, Medium, and Dark Roasts Explained
The roast level of your coffee beans plays a huge role in determining how your coffee will taste.
- Light roasts are light brown, with no oily surface. They’re known for their bright acidity and vibrant, fruity, or floral notes. These roasts keep much of the bean’s natural flavor intact.
- Medium roasts are a popular choice, especially for beginners. They’re medium brown, rarely oily, and offer a balanced flavor profile with mild acidity and a touch of caramel-like sweetness. They’re also forgiving - small brewing errors won’t drastically affect the taste.
- Dark roasts range from dark brown to nearly black and often have an oily sheen. These beans deliver bold flavors, such as smoky or chocolatey notes, with low acidity and a heavier body. However, the intense roasting process can overshadow the bean’s original flavor, so you’ll mostly taste the roast itself.
"If you want to taste the bean, I say go light to medium. And remember, caffeine levels drop as the roast level darkens." - Alton Brown, Author and Food Scientist [14]
Here’s a fun fact: light roasts pack more caffeine per scoop because they’re less dense, meaning you get more beans by volume.
When brewing, keep in mind that roast levels also affect water temperature. Dark roasts work best with slightly cooler water (around 195°F) to prevent over-extraction, while light roasts thrive with hotter water (205–210°F) to bring out their sweetness [3].
Once you’ve chosen a roast level that suits your taste, you’ll need to decide between blends and single-origin beans.
Blends vs. Single-Origin Beans
Single-origin beans are sourced from one specific region or farm, offering distinct flavors that reflect their growing conditions. On the other hand, blends combine beans from multiple regions to create a balanced and consistent flavor profile.
For beginners, blends are a great starting point. They’re more forgiving of brewing mistakes and provide a reliable, well-rounded cup. Once you’ve gained confidence with your brewing technique - such as mastering pour-over - you can experiment with single-origin beans to explore unique flavor profiles like bright acidity or subtle fruitiness [2] [8].
"If you're a beginner, start with blends, which tend to be more forgiving." - Keep Roasting [2]
Freshness and Grind Options
Freshness is key to a great cup of coffee. Look for a roast date on the bag rather than a "best before" date, which could be up to a year away and isn’t a reliable indicator of peak flavor. For brewing methods like pour-over or French press, coffee typically tastes best between 3 and 5 days after roasting and should ideally be used within a month [15].
To keep your coffee fresh:
- Buy only as much as you’ll use in one to two weeks.
- Store beans in an airtight container in a cool, dark place. Avoid the fridge or freezer, as condensation can harm the beans.
- Always grind your coffee just before brewing. Whole beans retain their flavor much longer than pre-ground coffee.
"Coffee beans are like wine, once the air is in, time starts ticking away." - Alton Brown [14]
Core Brewing Principles Every Beginner Should Know
Once you've chosen your beans, it's time to focus on the basics that can take your coffee from decent to delightful. Three main factors - ratios, grind size, and water quality - play a huge role in how your coffee tastes. Nail these, and you'll be on your way to consistently brewing a great cup.
Coffee-to-Water Ratios
Getting the coffee-to-water ratio right is key to balancing strength and flavor. Since water makes up over 98% of your brew, the ratio directly affects extraction [17].
The Specialty Coffee Association recommends a "Golden Ratio" of 1:18 (1 gram of coffee for every 18 grams of water) as a standard starting point [16]. For beginners, ratios between 1:15 and 1:17 usually hit the sweet spot. Lower ratios (like 1:12) yield a stronger, more concentrated brew, while higher ratios (such as 1:18) produce a lighter, more delicate cup.
To get precise measurements, use a digital gram scale - tablespoons can be unreliable since bean density varies. Here's a quick example: if you're brewing 300 grams of water at a 1:15 ratio, you'll need 20 grams of coffee (300 ÷ 15 = 20).
| Brewing Method | Recommended Ratio Range | Ideal Grind Size |
|---|---|---|
| French Press | 1:12 to 1:16 | Coarse |
| Pour-Over | 1:14 to 1:16 | Medium-Fine to Medium-Coarse |
| Drip Coffee Maker | 1:16 to 1:18 | Medium |
| Cold Brew (Concentrate) | 1:5 to 1:8 | Coarse |
Adjust the ratio based on roast level: lighter roasts, which are denser, often need more water to extract properly, while darker roasts, which extract faster, may require less.
"Coffee isn't magic, it's science and skill. Brewing delicious coffee is about using good ingredients well, learning which variables we control, and creating a repeatable process for ourselves."
– Mike Greene, Barista [17]
Once you’ve fine-tuned your ratio, the next step is dialing in the grind size for balanced extraction.
Grind Size and Extraction Basics
Grind size controls how quickly flavors are extracted from your coffee [3]. Finer grinds have more surface area, leading to faster extraction, while coarser grinds slow things down.
Choosing the wrong grind size can lead to two common problems:
- Over-extraction: Happens when the grind is too fine or the brew time is too long, resulting in bitter, unpleasant flavors.
- Under-extraction: Occurs when the grind is too coarse or the brew time is too short, leaving your coffee sour and weak.
Match the grind size to your brewing method: coarse (like sea salt) for French Press, medium (similar to table salt) for drip machines, and medium-coarse to medium-fine (somewhere between raw sugar and sand) for pour-over [18] [19] [3]. If your coffee tastes bitter, try a coarser grind; if it’s sour, go finer [3].
For best results, use a burr grinder. Unlike blade grinders, which create uneven particles, burr grinders produce consistent sizes for even extraction [20].
Once your grind size is set, the final piece of the puzzle is water quality and temperature.
Water Quality and Temperature
Since water makes up nearly all of your coffee, its quality has a huge impact on the final flavor [17] [21]. Avoid distilled or reverse osmosis water, as they lack the minerals needed for proper extraction. Filtered tap water works best, and a simple carbon filter (like a Brita pitcher) can remove chlorine and odors while keeping those essential minerals intact.
Temperature also matters. The ideal brewing range is 195°F to 205°F (90.5°C–96°C). Water that's too hot (close to boiling at 212°F) can over-extract, leading to bitter or burnt flavors, while cooler water produces a weak, flat cup.
Adjust the temperature based on your roast:
- Light roasts: Use hotter water (203°F–212°F) to bring out sweetness and reduce sourness.
- Medium roasts: Aim for 194°F–203°F for a balanced flavor.
- Dark roasts: Stick to cooler water (185°F–195°F) to avoid bitterness [21].
No thermometer? Bring water to a boil, then let it cool for 30 to 60 seconds to hit roughly 200°F - the sweet spot for most brewing methods.
"Desirable and tasty solubles dissolve in water more readily than the unpleasant-tasting substances, so getting a tasty brew is all about stopping the brewing at the perfect moment."
– Jesse Raub, Writer, Serious Eats [3]
Pro tip: Preheat your equipment by rinsing paper filters and your carafe with hot water. This step helps stabilize the brewing temperature and prevents any unwanted papery flavors [3].
sbb-itb-ed7145d
Step-by-Step Brewing Instructions for 4 Methods
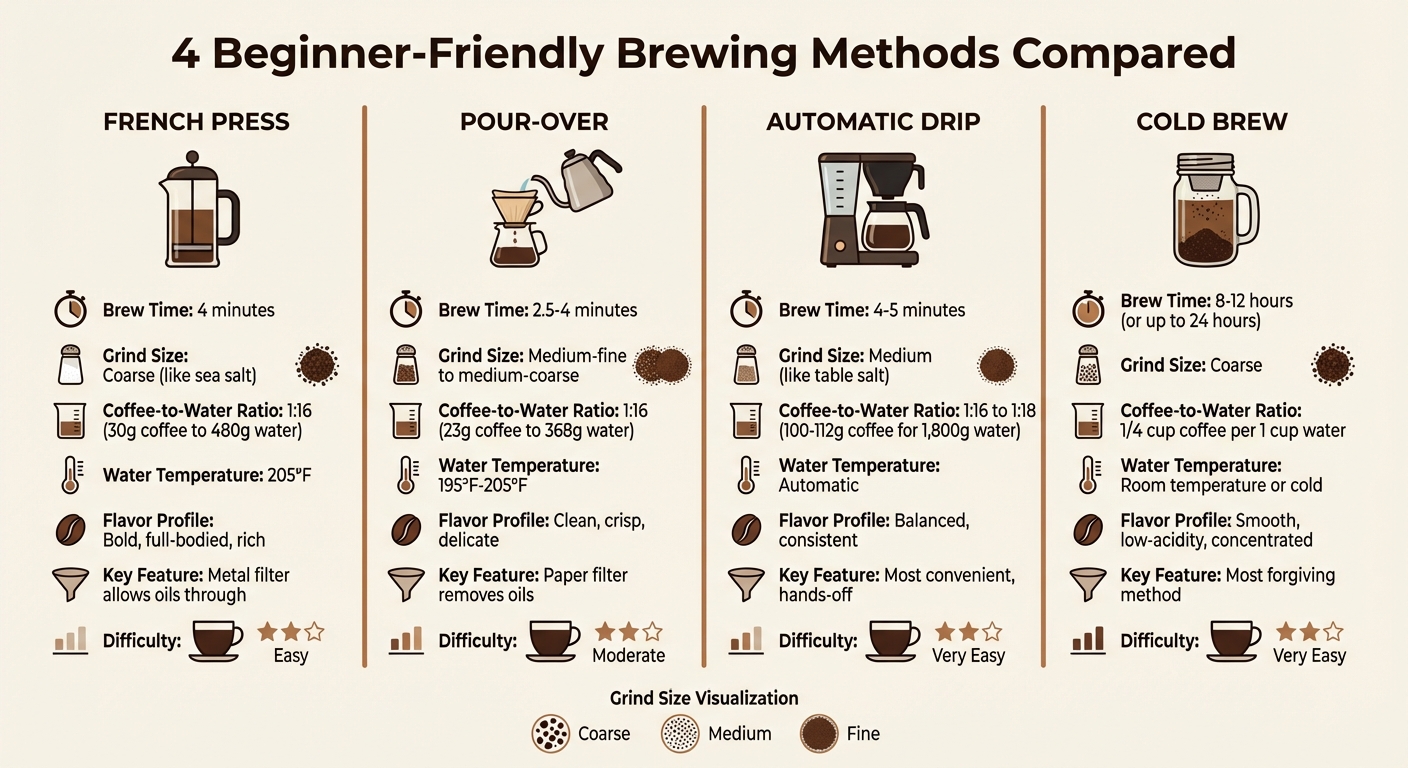
Home Coffee Brewing Methods Comparison Guide for Beginners
Now that you’ve got the basics down, let’s dive into the details of brewing. These four beginner-friendly methods will help you craft a delicious cup of coffee when followed carefully. Each method offers a unique flavor profile, so you can pick the one that best suits your taste.
How to Use a French Press
The French press is perfect for a bold, full-bodied cup. This method uses full immersion brewing, meaning the coffee grounds stay in contact with water the entire time. Unlike paper filters, its metal mesh allows natural oils and fine particles to pass through, creating a richer, denser brew [27, 14].
What You’ll Need:
- French press
- Coarsely ground coffee (similar to coarse sea salt)
- Hot water (205°F)
- Digital scale
- Timer
- Spoon
Instructions:
- Heat water to 205°F and preheat the French press. Discard the rinse water.
- Add 30 grams of coarsely ground coffee to the press, tare your scale, and start your timer.
- Pour about 60 grams of hot water over the grounds to saturate them, then stir gently. Let it bloom for 30–45 seconds to release CO₂.
- Slowly pour the rest of the water to reach 480 grams (a 1:16 coffee-to-water ratio).
- Place the lid on with the plunger raised and let the coffee steep for 4 minutes.
- At 3:45, lift the lid, break the surface crust with a spoon, and skim off any foam.
- Replace the lid and press the plunger down slowly over 20–30 seconds. Pour the coffee immediately to stop extraction.
"The French press (aka press pot or cafetière) is the most approachable way to brew a rich, full-bodied cup. With the right ratio, grind size, water temperature, and timing, you'll pull out chocolatey sweetness without the mud."
– Mugcult [18]
Pour-Over Brewing Basics
For a clean, crisp cup that highlights the coffee’s natural flavors, try the pour-over method. This technique gives you control over the brewing process, resulting in a lighter, tea-like coffee. The paper filter removes oils and sediment, creating a smooth and delicate flavor [34, 14].
What You’ll Need:
- Pour-over dripper (e.g., Hario V60 or Kalita Wave)
- Paper filter
- Gooseneck kettle
- Medium-fine to medium-coarse ground coffee
- Digital scale
- Timer
- Hot water (195°F–205°F)
Instructions:
- Rinse your paper filter with hot water to remove any papery taste and preheat your brewing vessel.
- Place the dripper on your scale, add the filter, and measure 23 grams of coffee. Tare the scale.
- Pour 46 grams of water (twice the coffee weight) in a slow, circular motion to saturate the grounds. Let it bloom for 30–60 seconds.
- Continue pouring in slow, concentric circles, pausing every 30–45 seconds, until you reach 368 grams of water (1:16 ratio).
- The entire brew should take 2.5 to 4 minutes. If the coffee tastes sour, try a finer grind; if it’s bitter, go coarser [22].
Using an Automatic Drip Coffee Maker
For a no-fuss option, the automatic drip coffee maker is a reliable choice. While these machines are convenient, they require some attention to grind size and ratios to avoid weak or overly bitter coffee.
What You’ll Need:
- Automatic drip coffee maker
- Medium ground coffee (similar to table salt)
- Paper or metal filter
- Digital scale
- Filtered water
Instructions:
- Use a medium grind. Too fine, and it may clog the filter; too coarse, and the water may pass through too quickly.
- Measure your coffee. A 1:16 to 1:18 ratio works well. For a standard 12-cup pot (60 oz or 1,800 grams of water), use 100–112 grams of coffee.
- Rinse the paper filter with hot water to remove any papery taste, then add your coffee.
- Add filtered water to the reservoir and start the machine.
- Once brewing is complete, transfer the coffee to a thermal carafe or serve immediately to prevent a burnt taste from prolonged heat exposure.
Simple Cold Brew at Home
Cold brew is a forgiving method that produces a smooth, low-acidity coffee concentrate. It’s great for earthy, chocolatey, or nutty flavors and works well with older beans or budget-friendly blends [23].
What You’ll Need:
- Mason jar, glass pitcher, or French press
- Coarsely ground coffee (similar to French press grind)
- Filtered water
- Coffee filter or fine-mesh sieve (optional cheesecloth)
Instructions:
- Combine 1/4 cup of coarsely ground coffee per cup of water in a jar. For a larger batch, use 1 pound of coffee to 9 cups of water. Stir to saturate the grounds, then cover and steep for 8–12 hours at room temperature (or up to 24 hours in the fridge).
- Strain the mixture using a coffee filter, fine-mesh sieve, or French press plunger.
- The result is a concentrate. Dilute with water or milk (1:1 ratio) and adjust to taste.
- Store the concentrate in an airtight container in the fridge. It’s best within 3 days but can last up to a week.
"One of the great things about cold brew is that it's very forgiving. It's probably one of the best ways to optimize less-than-stellar beans."
– Jessica Easto, Author of How to Taste Coffee [23]
Creating Your Daily Coffee Routine
Once you’ve got the basics down, the secret to consistently great coffee is sticking to a routine. A simple daily process ensures you can brew an excellent cup with minimal effort. By combining this routine with the techniques and ratios we’ve already covered, you’ll find it easier to nail your perfect cup every time.
Setting Up a Coffee Station
You don’t need a fancy setup to create a functional coffee station. Just designate a small spot on your kitchen counter for the essentials: your grinder, brewer, kettle, scale, and coffee beans. Store your beans in an airtight container at room temperature, away from sunlight, heat, and moisture[24]. And since coffee is mostly water - over 98%, in fact[1] - make sure you’re using filtered water. Keeping a pitcher with a built-in filter nearby makes this super convenient.
Preheating is another trick that can improve your brew. Rinse your carafe and mug with hot water before you start brewing to stabilize the temperature[24]. If you’re using Fwing Coffee tools, arrange them in a way that feels natural, so the steps from grinding to brewing flow smoothly.
Once your station is organized, make cleaning part of your routine to keep everything running smoothly.
Cleaning and Maintenance
Regular cleaning is essential to avoid stale coffee oils ruining your flavor. After each use, rinse your carafes, brew baskets, and reusable filters with hot water[24]. For grinders, brush out old grounds every few days, and plan for a deeper clean every 2–4 weeks[26]. To keep your brewer in top shape, descale it every three months with a phosphate-free descaling solution. This removes mineral buildup that can stop water from reaching the ideal brewing temperature of 195°F–205°F[25][7].
If you use paper filters, rinse them with hot water before brewing to get rid of any papery taste. And don’t forget to preheat your brewing vessel - it’s a small step that makes a big difference[24].
Fixing Common Brewing Problems
When your coffee doesn’t taste quite right, don’t panic - troubleshooting is easier when your setup is organized and clean. Adjust one variable at a time to figure out what’s causing the issue.
- If your coffee tastes bitter or harsh, it’s likely over-extracted. Try a coarser grind, lower the water temperature (below 205°F), or shorten your brew time[3][7][2].
- If it’s sour, thin, or weak, you’re dealing with under-extraction. Use a finer grind, increase the water temperature closer to 205°F, or make sure you’re sticking to the proper 1:15 to 1:17 coffee-to-water ratio[3][7][2].
- A gritty texture signals too many fines from your grinder. Switching to a burr grinder can solve this[7][24].
- For inconsistent results, ditch the guesswork and use a digital scale every time. Precision is the quickest path to a reliably great cup[3][2][24].
Here’s a quick reference table for common coffee issues:
| Problem | Taste Profile | Likely Cause | Recommended Fix |
|---|---|---|---|
| Sour / Thin | Sharp, acidic, weak | Under-extraction | Use a finer grind, hotter water, or increase brew time [3][7][2] |
| Bitter / Harsh | Astringent, smoky | Over-extraction | Use a coarser grind, lower water temp, or decrease brew time [3][7][2] |
| Papery | Cardboard-like | Unrinsed filter | Rinse paper filter with hot water before brewing [4][3][24] |
| Gritty / Silty | Muddy texture | Too many "fines" | Upgrade to a higher-quality burr grinder [7][24] |
| Inconsistent | Varies daily | Eyeballing amounts | Use a digital scale to maintain a strict coffee-to-water ratio [3][2][24] |
Conclusion: Start Your Brewing Journey Today
You're now equipped with the essentials to craft exceptional coffee right in your own kitchen. The foundation is straightforward: invest in a dependable burr grinder for consistent grounds, use a digital scale to nail the perfect ratio, and start with an approachable method like the French Press.
Once you've mastered the basics, home brewing opens the door to endless possibilities. You can experiment and fine-tune every aspect of your coffee-making process - from grind size to water temperature - to create a cup that's perfectly tailored to your taste[2]. This level of control is something you simply can't get when someone else makes your coffee.
Start with simple tools and focus on adjusting one variable at a time[7]. Fwing Coffee offers reliable equipment to help you achieve consistent results. Whether you prefer the full-bodied richness of a French Press or the bright clarity of a pour-over, practice is the key to unlocking consistency.
Your first few brews might not be perfect, but they’ll get better with time. As you practice, you'll develop the intuition and skills needed to brew with confidence. As Keep Roasting puts it:
"Every cup you brew will be fresh, flavorful, and perfectly tailored to your preferences." - Keep Roasting [2]
No long lines, no barista mishaps - just great coffee, made exactly the way you like it. Treat each brew as a step closer to mastering the art of coffee.
FAQs
What’s the easiest way for a beginner to start brewing coffee at home?
For those just starting out, the pour-over method is an excellent choice. It’s straightforward, budget-friendly, and gives you control over important factors like grind size, water temperature (aim for about 200°F), and the coffee-to-water ratio (typically 1 gram of coffee to 15–18 grams of water). To get started, you’ll need a dripper, filters, a gooseneck kettle, and a burr grinder. The process is simple to follow, and observing the water as it flows through the coffee grounds is a great way to understand how extraction works.
If you’re looking for something even easier, the French press is a solid alternative. Just mix coarsely ground coffee with hot water, give it a stir, let it steep for 4 minutes, and press. It’s low-effort and only requires a press and a kettle. That said, the pour-over method is often preferred for its mix of simplicity and its ability to deliver clean, café-style coffee.
How do I pick the right grind size for my brewing method?
Choosing the right grind size is essential for brewing coffee that tastes just right. The grind size directly influences how the flavors are extracted during brewing. Finer grinds extract flavors more quickly, while coarser grinds take longer. For the best consistency, a burr grinder is your go-to tool.
Here’s a quick breakdown of grind sizes and their uses:
- Coarse: Works well for French press or cold brew, where long steep times are required.
- Medium: Suited for drip coffee makers or pour-over methods like Chemex.
- Fine: Great for espresso and AeroPress, which have shorter brew times.
- Extra-fine: Specifically for Turkish coffee.
If your coffee tastes sour, it’s probably under-extracted - try using a finer grind. On the other hand, if it’s too bitter, it’s likely over-extracted - opt for a coarser grind. Make small adjustments until you hit that perfect balance. Keep track of your grinder settings and brewing details, like water temperature (195–205°F), to ensure consistent results every time.
What factors influence the flavor of coffee brewed at home?
The flavor of your home-brewed coffee isn’t just luck - it’s shaped by a handful of key factors you can control. Here's what to keep in mind:
- Coffee-to-water ratio: A good baseline is 1 gram of coffee for every 15–18 grams of water. Tweak this ratio to find your perfect balance of strength and flavor.
- Grind size: The grind matters! Coarser grinds are ideal for methods like French press, while finer grinds suit pour-over brewing. Matching the grind size to your brewing method ensures even extraction and better taste.
- Water temperature: Stick to a range of 195–205°F. This temperature extracts the best flavors without veering into bitterness. A temperature-controlled kettle can make this easier.
- Brew time: Timing is everything. If the water spends too little time with the coffee grounds, the result can taste sour. Too long, and you risk bitterness.
- Water quality: Use clean, filtered water with balanced minerals. It’s a small detail, but it makes a big difference in flavor consistency.
- Bean freshness and roast level: Freshly roasted beans are key to unlocking rich aromas. Whether you go for a light, medium, or dark roast, your choice influences the flavor - from fruity and bright to deep and chocolatey.
By adjusting these variables, you can craft a cup of coffee that matches your preferences, whether you’re after the clean clarity of a pour-over or the bold richness of a French press.