
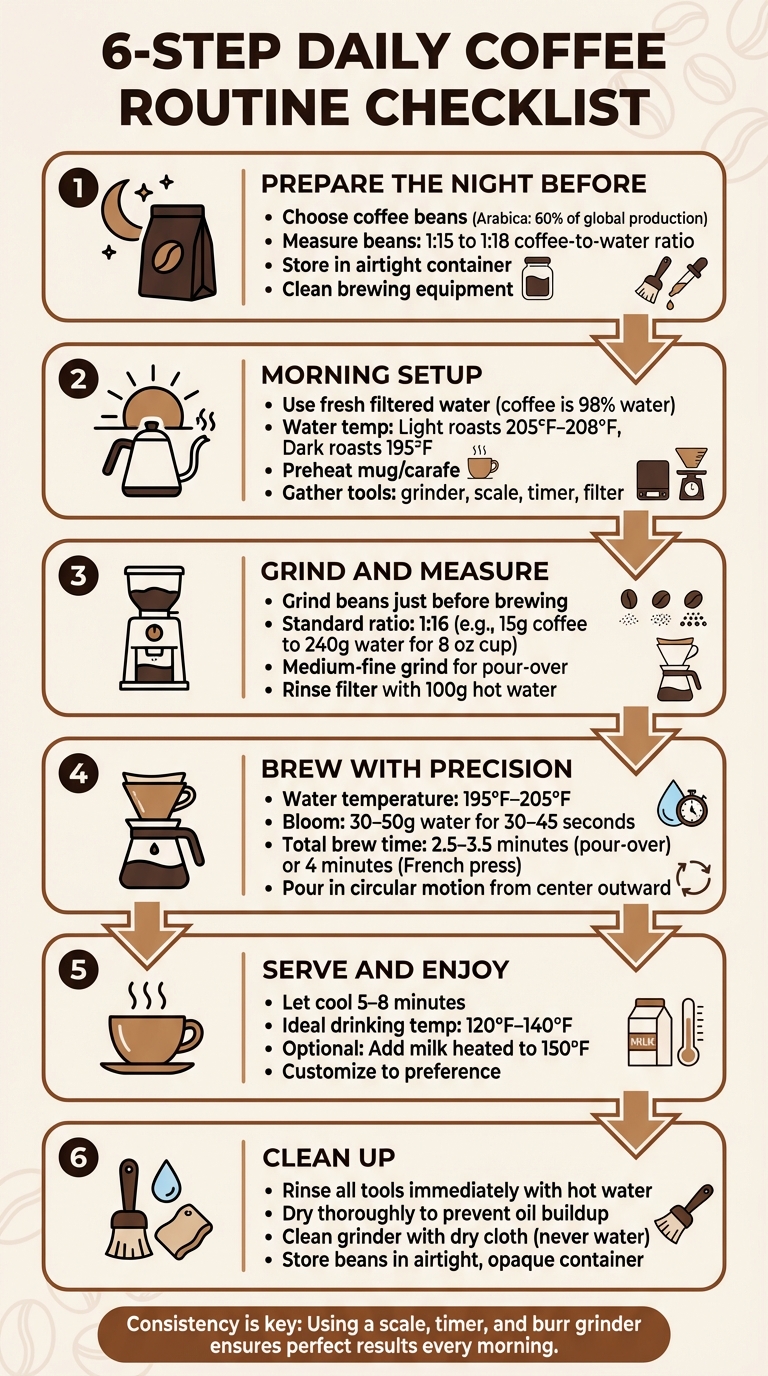
Brewing the perfect cup of coffee doesn’t have to be complicated. A consistent morning coffee routine can make your mornings smoother, more mindful, and set the tone for the rest of your day. Here’s how you can elevate your coffee experience with six simple steps:
- Prepare the night before: Choose and measure your coffee beans, clean your equipment, and store beans in an airtight container.
- Morning setup: Use fresh filtered water, preheat your mug or carafe, and organize your brewing tools for efficiency.
- Grind and measure: Grind beans just before brewing, adjust the grind size for your method, and stick to a 1:15–1:18 coffee-to-water ratio.
- Brew with precision: Heat water to 195°F–205°F, bloom the coffee grounds for 30–45 seconds, and pour evenly for balanced extraction.
- Serve and enjoy: Let your coffee cool slightly to the ideal drinking temperature (120°F–140°F), and customize with milk or cream if preferred.
- Clean up: Rinse and dry all tools immediately to maintain coffee quality and hygiene.
This step-by-step guide ensures a flavorful and consistent cup every morning while turning your coffee-making process into a calming ritual. By focusing on precision and mindfulness, you’ll enjoy better-tasting coffee and a stress-free start to your day.
6-Step Daily Coffee Brewing Routine Checklist
My Daily Coffee Routine: How I Brew Coffee Every Day
sbb-itb-ed7145d
Step 1: Prepare the Night Before
Taking a few minutes to prep the night before can make your morning coffee routine a breeze. By setting up your beans, measuring your dose, and cleaning your tools in advance, you’ll save time and ensure a smooth, stress-free start to your day.
Choose Your Coffee Beans
The type of coffee beans you choose sets the tone for your cup. Arabica beans are known for their sweet, delicate flavors and higher acidity, while Robusta beans offer a stronger, earthier taste with more caffeine. When it comes to roast levels, light roasts highlight bright, fruity notes; medium roasts provide a balanced sweetness; and dark roasts deliver bold, smoky flavors. Beans from Africa often have floral and citrusy profiles, while those from South America tend to be smooth and nutty.
Freshness is key. While Arabica accounts for 60% of global coffee production [6], the roast date on the bag matters more than the origin. Avoid brewing beans that are less than two days old - they need time to "degas", or they may taste bitter [7][8]. For the best flavor, aim to use beans between 2 days and 4 weeks after roasting [7]. To preserve freshness overnight, store your beans in an airtight, opaque container at room temperature, away from oxygen and light [7][8].
Measure Your Coffee Beans
Accuracy is everything when it comes to brewing great coffee, and a digital scale is your best friend. Skip the scoops and weigh your beans the night before. The standard coffee-to-water ratio is between 1:15 and 1:18 by weight [9]. For a 12 oz (355ml) cup at a 1:16 ratio, you’ll need about 22g of whole beans. While one tablespoon holds approximately 5–7g, bean density can vary by roast, so a scale ensures consistency.
Once measured, store your beans in an airtight container or your grinder’s hopper to lock in their aroma and save time in the morning [9]. If your brew tastes too strong, adjust the ratio to 1:18; if it’s too weak, try 1:15 [9][10].
Clean Your Brewing Equipment
Leftover coffee oils can spoil the taste of your brew, so cleaning your tools is a must. Wash your pour-over dripper, French press, or other brewing equipment with warm water and a gentle scrub, then dry them thoroughly. For drip machines, flush the group head to clear out any residual grounds [11][12]. Don’t forget to wipe down your grinder and frother, and empty any waste bins to start fresh.
"If you don't clean your tools consistently, coffee oils will build up and go rancid, affecting the final flavor in your cup." – Ritual Coffee Roasters [2]
Step 2: Morning Setup
With last night's prep out of the way, it's time to focus on getting your water and equipment ready for brewing. Your beans are set, your tools are clean - now it's all about fine-tuning the details. Start by ensuring your water is fresh and at the right temperature, preheat your equipment, and organize everything you'll need for a seamless coffee-making experience.
Fill Your Kettle with Fresh Water
Since coffee is over 98% water, the water you use has a huge impact on flavor [13]. Always choose cold, filtered water instead of tap water, which can contain chemicals and minerals that may alter the taste [13]. For a 10 oz cup, the ideal ratio is about 340 g of water to 20 g of coffee [13]. If you're using a pour-over method, a gooseneck kettle is a great choice - it allows for controlled, precise pouring, which ensures even extraction [14].
For water temperature, match it to your roast. Lighter roasts thrive at 205°F–208°F, while darker roasts do better around 195°F [3]. No thermometer? No problem - just let boiling water cool for about 10 seconds, which typically brings it into the 195°F–205°F sweet spot [14].
"Coffee is over 98% water, so using filtered water, rather than tap, will allow your coffee to really shine." – Driven Coffee [13]
Preheat Your Mug or Carafe
Preheating your brewing vessel is a small step that makes a big difference. Cold mugs or carafes can steal heat from your coffee, lowering the brew temperature and affecting both flavor and warmth [17]. To prevent this, pour some boiled water into your mug or carafe while your kettle heats up, and let it sit for about a minute [16]. If you're using a pour-over setup, rinse the filter with hot water directly into the vessel - this not only warms it but also eliminates any paper taste from the filter [15]. Just remember to discard the rinse water before brewing.
"Preheat your brewing equipment with hot water. This will minimize the loss of heat when your water meets room-temp ceramic, glass, coffee grounds, etc." – Olympia Coffee [4]
Gather Your Brewing Tools
Before grinding your beans, make sure everything you need is within easy reach. This includes your Fwing Coffee grinder, a digital gram scale, a timer, your filter (whether paper, metal, or cloth), and your gooseneck kettle [2]. Being organized not only saves time but also ensures a smooth workflow - no scrambling around mid-brew. Pay special attention to your grinder: a burr grinder is ideal because it produces consistently sized particles, which is essential for even extraction. Blade grinders, on the other hand, often create uneven grounds [2].
"Our overwhelming consensus at Ritual is that a scale and timer are key." – Ritual Coffee [2]
Step 3: Grind and Measure
With your morning setup ready, it's time to fine-tune the foundation of your coffee. Getting the grind size and coffee-to-water ratio just right is key to achieving a well-balanced brew. These elements determine whether your cup tastes smooth, sour, or bitter.
Grind Your Coffee Beans
Always grind your beans just before brewing to lock in their flavor. For methods like the V60 or Kalita Wave, aim for a medium-fine grind that resembles granulated sugar. For a French press, go with a coarser grind, similar to sea salt. Using a burr grinder is crucial - it ensures uniform particles and a more even extraction. If your coffee tastes sour, try a finer grind. If it’s too bitter, go coarser.
"The longer the brewing time, the coarser the grind should be." – OutIn Team [19]
Weigh Your Coffee Grounds
Precision is key here. Use a digital scale to weigh your coffee grounds, sticking to the standard 1:16 ratio for a balanced flavor. For an 8 oz cup (240 g of water), you'll need about 15 g of coffee. If you prefer a stronger brew, go for a 1:15 ratio. For something milder, try 1:18.
"Small changes in the coffee-to-water ratio can have a major impact. If you are still measuring coffee with scoops, we highly recommend switching to a gram scale." – Counter Culture Coffee [5]
Rinse Your Filter
Before brewing, rinse your paper filter with about 100 g of hot water. This step removes any papery taste and pre-warms your brewing vessel. Make sure the entire filter is wet, leaving no dry spots. Once done, discard the rinse water from your carafe or mug to avoid diluting your coffee.
"By saturating the filter with hot water, you create a more uniform surface for the water to pass through, reducing the likelihood of channeling or uneven extraction." – Reya Badiang, Win Win Coffee [22]
Step 4: Brew Your Coffee
With your coffee perfectly ground and measured, it's time to bring out its best flavors.
Now that your filter is rinsed and your grounds are prepared, follow these steps to get the most out of your brew.
Heat Water to the Right Temperature
The ideal brewing temperature is between 195°F and 205°F. Water that's too cool can leave your coffee tasting sour due to under-extraction, while overly hot water can scorch the beans, leading to bitterness. As Ritual Coffee explains:
"Most coffees brew best between 200°F and 205°F, any hotter and you'll scorch the beans." – Ritual Coffee
If your kettle has a built-in thermometer, use it to hit this sweet spot. Otherwise, bring your water to a boil and let it cool for about 30 seconds before pouring. Preheating your kettle can also help maintain the perfect temperature.
Bloom Your Coffee Grounds
Start by pouring about 30–50g of hot water over your coffee grounds in a circular motion, beginning at the center and moving outward. As the water hits the grounds, you'll notice them puffing up and releasing gas - this is called blooming. It’s a key step for even extraction. Gently swirl the mixture to break up any clumps.
"Once the off gassing is complete, the grounds are more receptive to absorbing water, resulting in a better extraction of flavors." – Peet's Coffee
Let the bloom sit for about 30 seconds before moving on to the next step.
Pour the Remaining Water
After blooming, slowly pour the rest of the water over the grounds in a steady, circular motion. Start from the center and work outward, but avoid pouring directly on the edges of the filter. This helps prevent water from bypassing the coffee grounds, which can lead to uneven extraction. As iKoffy emphasizes:
"A controlled, consistent pour ensures even saturation and extraction." – iKoffy
For pour-over methods, aim for a total brew time of 2.5 to 3.5 minutes. If you're using a French press, about 4 minutes is perfect. To keep your coffee balanced, use a scale to track your water-to-coffee ratio, sticking to the standard 1:16 ratio (1 gram of coffee to 16 grams of water). This attention to detail makes all the difference for a flavorful cup.
Step 5: Serve Your Coffee
With your coffee brewed to perfection, it’s time to enjoy it the right way. Here’s how to make the most of your cup.
Check Your Brew Time
Keeping an eye on your brew time is key to consistency. If your brew finishes in less than 2.5 minutes, your grind might be too coarse. On the other hand, brewing for over 3.5 minutes likely means the grind is too fine [18][20].
After ensuring your brew time is just right, let your coffee rest for 5 to 8 minutes before sipping. This short cooling period brings the temperature down to the ideal range of 120°F–140°F, where the roaster's subtle flavors truly stand out. Serving coffee hotter than 150°F can mask these delicate notes [13][17].
Once it’s ready, you can customize your cup to fit your preferences.
Add Milk or Froth (Optional)
If you enjoy a creamier coffee, now’s the time to make it your own with a handheld electric whisk. For French press coffee, adding cream or milk can enhance its richness [2]. If you’re using a pour-over method, a light splash of cream works best to maintain the floral and delicate flavors [16][24]. For latte or breve lovers, a 4-in-1 milk frother and steamer can help you achieve that smooth, velvety texture.
For the best experience, heat your milk to about 150°F - just enough to complement your coffee’s temperature without burning it [23]. As Buffy Maguire, Founder of Lady Falcon Coffee Club, puts it:
"Personally, I like as little milk as possible, but will use a tiny amount of cream when drinking for pure pleasure" [16].
Give your coffee a gentle stir, and it’s ready to enjoy.
Step 6: Clean Up
Once you've savored your perfectly brewed coffee, it's time to clean up. Proper cleanup not only keeps your equipment in top shape but also ensures your next cup tastes just as good. Plus, keeping things clean is essential for hygiene - especially since the coffee machine reservoir is considered one of the most germ-prone spots in your home [27].
Rinse Your Tools Right Away
Right after brewing, rinse all your tools - filters, carafes, and coffee makers - with hot water. Then, dry them immediately with an absorbent towel to avoid water spots [25]. This quick rinse prevents coffee oils (caffeol) from building up and turning rancid, which can leave your next brew tasting bitter [25][26]. Heather Calatrello, Owner and Head Roaster at ShedLight Coffee Roasters, emphasizes the importance of daily maintenance:
"Daily maintenance is straightforward and only takes a few minutes... Regular cleaning consists of simply rinsing and drying all coffee maker components after use" [27].
For electric brewers, leave the reservoir lid open after use to let the chamber air-dry completely [27].
Clean Your Grinder and Frother
Grinders need special care to avoid damage. Never use water on the grinder components - this can cause motor issues or rust [27]. Instead, wipe away coffee grounds and oils daily with a soft, dry cloth, especially if you use dark roast beans, which tend to be oilier [27]. For a deeper clean, unplug your grinder every week or two, remove the hopper, and use a grinder brush or dry toothbrush to clean the burrs and edges [28][29]. Wash any removable parts with warm, soapy water, and make sure they're completely dry before reassembling [28].
For your frother, hand-wash any detachable parts with warm, soapy water and dry them thoroughly before storing. Regular maintenance of both your grinder and frother ensures consistent coffee quality.
Store Your Coffee Beans Correctly
Proper storage is key to keeping your beans fresh. Transfer them to an opaque, airtight container to protect them from oxygen, light, heat, and moisture [7][21]. Store the container in a cool, dark place like a pantry, away from heat sources or direct sunlight [7][30]. Coffee professional and journalist Ever Meister offers this advice:
"For top-of-the-line coffee freshness, an airtight or one-way or vacuum-valved container will do best to keep out the three things that negatively affect roasted coffee: moisture, light, and air" [8].
Avoid storing coffee in the fridge or freezer - the high humidity can actually make it go stale faster [2].
Conclusion
Transforming your rushed mornings into calm, rewarding ones can be as simple as following a daily coffee-making checklist. By weighing your coffee, keeping water at an ideal temperature of 195°F–205°F, and grinding your beans just before brewing, you can ensure every cup is brewed exactly to your liking - no more disappointing or inconsistent results.
But this routine isn’t just about flavor. It brings order and mindfulness to the start of your day. As Benjamin Elmalek puts it:
"How you begin your morning will set the mood for the rest of your day. Set yourself up for success before you even leave your house" [31].
Taking the time to focus on each step of the process can feel almost meditative, offering a moment of calm before the busyness begins [3][1].
The key difference between a routine and a ritual lies in intention. When you approach each step with purpose, your coffee-making becomes more than just a task - it becomes a meaningful ritual. This deliberate approach can reduce stress and sharpen focus, which is especially valuable considering that 87% of adults face daily stress [32].
And consistency? It’s everything. As one expert explains:
"The more consistent you are, the more consistent your brews will be" [2].
By using tools like a scale, timer, and burr grinder, you eliminate the guesswork and can replicate your perfect cup every single morning. Over time, you’ll develop a sense of mastery, turning a simple act into a source of daily satisfaction.
Start tomorrow with Step 1 and see how this structured approach transforms brewing coffee from a mundane task into an enjoyable craft.
FAQs
What is the best coffee-to-water ratio for different brew strengths?
The coffee-to-water ratio is all about how you like your coffee. For a mild cup, go with a 1:18 ratio (1 part coffee to 18 parts water). If you prefer something medium-strength, aim for 1:16, and for a stronger brew, try 1:15. For those who love a bold, full-bodied flavor, a 1:13 ratio might be just right.
Using a kitchen scale helps nail the measurements. For instance, if you're making a medium-strength cup, you’d use 1 ounce of coffee and 16 ounces of water. Feel free to tweak the ratio to match your taste and enjoy a cup that’s just how you like it!
What’s the best way to keep my coffee beans fresh for longer?
To keep your coffee beans tasting fresh and full of flavor, it’s important to shield them from air, light, heat, and moisture. A good starting point is to buy smaller quantities - just enough to last 1–2 weeks - so you’re always brewing with fresh beans. Store your beans in an airtight, opaque container made of glass, metal, or ceramic. Keep the container in a cool, dark place like a pantry or cupboard, far from heat sources and direct sunlight.
Skip the fridge or freezer - these can add moisture and unwanted odors to your beans. Instead, store them at room temperature, ideally between 65–70°F. Make sure to seal the container tightly after every use to limit air exposure. For the best flavor, try to use your beans within two weeks of roasting and definitely within six months. These simple steps can make all the difference in brewing a consistently delicious cup of coffee.
Why should I grind coffee beans right before brewing?
Grinding your coffee beans right before brewing is key to keeping their aromas and flavors intact. These delicate qualities are highly vulnerable to air exposure. Once the beans are ground, oxidation kicks in, quickly diminishing their freshness and dulling the taste. By grinding just before you brew, you guarantee a brighter, more flavorful cup every single time.