
Starting your coffee brewing journey at home doesn't have to be complex or expensive. With the right tools, you can consistently make great coffee while experimenting with different brewing methods. Here's a quick rundown of the 10 must-have tools for beginners:
- Coffee Grinder: A burr grinder ensures uniform grounds for better flavor extraction.
- Digital Scale: Helps maintain precise coffee-to-water ratios for consistent results.
- Gooseneck Kettle: Offers precise pouring control, crucial for methods like pour-over.
- Pour-Over Dripper: Delivers clean, bright coffee by allowing control over water flow.
- French Press: A simple method for rich, full-bodied coffee.
- Coffee Server or Carafe: Keeps brewed coffee warm without altering its flavor.
- Filter Papers: Enhance clarity by trapping oils and fine particles.
- Coffee Storage Container: Protects beans from oxygen, light, and moisture for longer freshness.
- Timer: Ensures accurate brew times for balanced flavor.
- Milk Frother: Creates café-style foam for lattes and cappuccinos.
These tools range in price from budget-friendly options to premium models, allowing you to build a setup that fits your needs and budget. Start with the essentials - grinder, scale, kettle, and a brewing device - and expand your setup as you refine your preferences.
Burr Grinder vs Blade Grinder: Complete Comparison for Coffee Brewing
The Essential Coffee Brewing Kit For Beginners (All You Need To Make Coffee At Home)
1. Coffee Grinder
"The grinder is the single most important tool for making great coffee at home. More important than your espresso machine, your sleek automatic brewer, or even the coffee beans themselves."
- Mark Prince, Senior Editor at CoffeeGeek
How It Enhances Coffee Flavor
Grinding your coffee beans just before brewing is a game-changer. It reduces oxidation, keeping the beans' aromatic oils and flavors intact. Plus, grinding increases the beans' surface area, allowing hot water to extract a richer, more complex range of flavors and aromas. The key to great coffee lies in a uniform grind, which ensures even extraction during brewing. This precision makes a quality grinder an essential starting point for anyone diving into home coffee brewing.
Beginner-Friendly Options
If you're just starting out, a burr grinder is the way to go. Unlike blade grinders, which produce inconsistent results, burr grinders deliver uniform grounds every time. Entry-level burr grinders typically come with 15 to 40 grind settings, making it easy to find the right texture for your brewing method - whether you're making espresso, drip coffee, or French press. If your coffee tastes overly bitter, try a coarser grind. On the other hand, if it feels thin or sour, switch to a finer setting.
Build Quality and Durability
A well-built grinder can make all the difference. Manual grinders priced around $100 often feature sturdy all-metal construction and stainless steel burrs. Electric grinders in the same range might use plastic housings but still offer solid performance. Brands like Baratza stand out for their accessible replacement parts and repair guides, which can extend a grinder's lifespan to 10–15 years. Some models also include anti-static features, like ionizers or plasma generators, to prevent coffee grounds from sticking to surfaces - making cleanup a breeze.
Price Range and Value
You don’t have to spend a fortune to get a reliable grinder. Manual burr grinders start at about $65 (e.g., the 1Zpresso Q Air), while entry-level electric options begin around $100, with popular models like the Baratza Encore typically priced at $150. In the $100–$180 range, you’ll find dependable grinders that balance performance and affordability. A high-quality manual grinder can be a budget-friendly option, but investing around $200 in a durable model often pays off in the long run, especially compared to inconsistent blade grinders.
2. Digital Scale
How It Improves Coffee Flavor
Coffee beans aren’t all created equal - bean density can vary significantly. For example, a tablespoon of Ethiopian roast might weigh 7 grams, while the same amount of Brazilian roast could weigh only 5 grams. This difference makes accurate brew ratios (typically between 1:15 and 1:17) essential for balancing flavors. A digital scale takes the guesswork out of the equation, delivering the precision needed for a consistent and flavorful cup. Since up to 30% of a coffee bean’s mass can dissolve in water during brewing, even small inconsistencies in measuring your coffee dose can noticeably alter the flavor. Precision, as mentioned earlier, is the backbone of a consistently great brew.
"Precision is everything when it comes to making a fantastic brew. I threw out every 'coffee scoop' in the house and started using weight instead of tablespoons." - Ever Meister, Journalist and Specialty-Coffee Professional
Ease of Use for Beginners
Digital scales are not just precise - they’re also incredibly user-friendly. Simply place your brewing vessel on the scale, zero it out, and add your coffee grounds and water. Many scales even include a built-in timer, which helps you track both weight and brew time. This makes it easier to replicate your favorite recipes with consistent results, even if you’re just starting out.
Build Quality and Materials
When it comes to build quality, there’s something for every budget. Entry-level models like the Escali Primo (around $23) and American Weigh SC (about $34) feature sturdy plastic housings that provide reliable performance for daily use. Mid-range options, such as the Hario Drip Scale (around $50) or LUCCA Precision (about $65), bring additional perks like water resistance and integrated timers. For those seeking professional-grade tools, high-end models like the Acaia Lunar (around $250) offer aluminum casings for enhanced durability and water resistance.
Price Range for Entry-Level Users
If you’re just getting started, basic coffee scales range from $20 to $35, with models like the Escali Primo offering excellent value. For those looking for more advanced features - such as built-in timers and 0.1-gram precision - expect to spend between $50 and $100. A scale with 0.1-gram increments is especially helpful for ensuring the consistent dosing that’s key to brewing a stellar cup of coffee.
3. Gooseneck Kettle
How It Improves Coffee Flavor
The gooseneck kettle’s distinctive narrow, curved spout gives you precise control over how and where water flows onto your coffee grounds. This level of control is crucial since brewed coffee is about 98% water. By ensuring an even pour, it promotes consistent saturation of all the grounds, which helps avoid uneven extraction and off-balance flavors. The steady, controlled stream minimizes agitation in the coffee bed, often leading to a smoother, more refined cup.
Electric gooseneck kettles take things a step further by letting you set the perfect brewing temperature - 195°F to 205°F (90.5°C to 96°C). This eliminates the guesswork of cooling boiling water, making it easier to hit the sweet spot for brewing.
"The narrow, curved spout gently pours water onto your coffee, giving you complete control over where, when and how fast your coffee extracts." - Vittoria Coffee
Ease of Use for Beginners
For those new to brewing, electric gooseneck kettles with variable temperature settings are a game-changer. They heat water quickly - some models can bring 600ml to 98°C in just 2 minutes and 24 seconds - and often include a "hold" function to maintain your chosen temperature for 30 to 60 minutes. This feature gives you ample time to prepare your coffee setup without feeling rushed.
The gooseneck design is also perfect for techniques like blooming, where you pour just enough water to saturate the grounds for 30 seconds before continuing. This step, made easier with precise pouring, enhances flavor extraction. The OXO Adjustable Temperature Kettle is often highlighted for its beginner-friendly design, featuring an ergonomic silicone-covered handle and easy-to-use controls.
Build Quality and Materials
High-quality gooseneck kettles are typically crafted from 304 stainless steel, valued for its durability and excellent heat retention. The Fellow Stagg EKG is a standout, known for its precise temperature accuracy - within 1 degree - and a counterbalanced handle that offsets the weight of the water for better control. Another great option is the Timemore Fish Smart, which offers a smooth, consistent pour and ergonomic design at a reasonable price point.
For stovetop enthusiasts, models like the Hario V60 Buono are built with thick stainless steel walls. While this ensures durability, it can take longer to heat water - up to 12 to 16 minutes to reach a boil.
Price Range for Entry-Level Users
Gooseneck kettles cater to a range of budgets without compromising on quality. Stovetop models start at around $30, while basic electric versions with variable temperature control are priced between $86 and $89. Mid-range options hover around $110, with premium models reaching up to $200. For beginners looking to save, a non-variable electric kettle (boil-only) under $90 is a solid choice. These kettles heat water faster than stovetops - just bring it to a boil, turn it off, and wait about 30 seconds to hit the ideal brewing temperature.
4. Pour-Over Dripper
How It Improves Coffee Flavor
Pour-over drippers rely on percolation, where water flows through coffee grounds, to create a cleaner, more refined cup. This method brings out the bean's natural fruit acids and sugars, giving the coffee a bright and sweet profile. Using paper filters helps trap oils and fine sediment, resulting in a "clean" cup that highlights these delicate flavors. The beauty of this method lies in the control it offers - you can adjust water flow and timing to emphasize sweetness and brightness while keeping bitterness in check. It's an approachable way for beginners to fine-tune flavor extraction.
"The sugars in coffee are your best friends. Perfectly extracted coffee showcases its sweetness with acidity and bitterness as sidekicks." - Vittoria Coffee
Ease of Use for Beginners
Flat-bottom drippers, like the Kalita Wave or Bee House, are especially beginner-friendly. Their smaller exit holes naturally slow water flow, making it easier to achieve even extraction. Plus, the Bee House uses standard #2 or #4 filters you can find at most grocery stores. On the other hand, cone-shaped drippers like the Hario V60 offer greater control but require a bit more skill when it comes to pouring techniques. Pairing any dripper with a gooseneck kettle can help you manage water flow more precisely. A quick tip: rinse your paper filter with hot water before brewing to remove any papery taste and preheat the dripper. Start your brew with a "bloom" by pouring about 15% of your water over the grounds and letting it sit for 30 seconds to release CO₂.
Build Quality and Materials
The material of your dripper plays a big role in consistency. Plastic drippers are a great choice for beginners because they retain heat better than ceramic or glass, ensuring stable brewing temperatures. For instance, the plastic Hario V60 is known for maintaining heat and delivering reliable results. While ceramic and glass drippers have a stylish, artisanal appeal, they tend to cool the water too quickly unless preheated thoroughly. If you're using ceramic or glass, make sure to rinse them with hot water before brewing to keep the temperature in the ideal range of 195°F to 205°F (90.5°C to 96°C).
Price Range for Entry-Level Users
Pour-over drippers are budget-friendly, making them accessible for beginners. A plastic Hario V60 starts at just $8, offering an affordable entry point. Ceramic or glass models typically cost between $20 and $40, while a 6-cup Chemex - an all-in-one option - can be found for around $40. Stainless steel drippers, which range from $50 to $75, are more of a luxury and not necessary for beginners. A basic plastic dripper can deliver excellent results without breaking the bank.
5. French Press
The French press is a simple yet effective way to brew a rich, full-bodied cup of coffee. If you're looking for a straightforward method that doesn't require fancy gadgets but still delivers bold flavors, this is a great choice to add to your coffee routine.
How It Improves Coffee Flavor
The French press uses a method called immersion brewing, where the coffee grounds stay in contact with the water the entire time. This slower and more forgiving process reduces the chances of over-extraction, which can lead to bitter flavors. Unlike paper filters used in other methods, the French press's metal mesh filter lets natural coffee oils and tiny particles pass through. The result? A cup that's syrupy, sweet, and packed with bold, complex flavors.
"French press brewing is less finicky than most other methods and can result in a more full-flavored brew with a deeper sweetness and syrupy body." - Nick Cho, Co-founder of Wrecking Ball Coffee Roasters
Ease of Use for Beginners
One of the best things about the French press is how beginner-friendly it is. You don’t need to master any precise pouring techniques or invest in a gooseneck kettle - a regular tea kettle works perfectly fine. The process is simple: add coarse coffee grounds, pour in hot water, give it a quick stir (30–45 seconds), and let it steep for 3–8 minutes. A good ratio to follow is 60–70 grams of coffee per liter of water (about 1:14 to 1:16). Once you're done steeping, press the plunger and serve immediately to avoid over-extraction.
Build Quality and Materials
French presses come in a variety of materials, including glass, plastic, and stainless steel. Glass models, often made from borosilicate glass, allow you to watch the brewing process unfold. Stainless steel options, particularly double-walled or vacuum-insulated ones, are fantastic for keeping your coffee hot during longer brewing times of 6 to 8 minutes.
Price Range for Entry-Level Users
French presses are accessible for almost any budget. Basic models from brands like Bodum start at around $20. If you're looking for something more durable or insulated, premium stainless steel models from brands like Espro or Fellow Clara can range from $35 to $119. For beginners, a $20 model is a perfect starting point and delivers excellent results.
6. Coffee Server or Carafe
A coffee server or carafe is designed to collect and hold brewed coffee, keeping it warm while preserving its flavor.
How It Enhances Coffee Flavor
Using the right server can make a noticeable difference in your coffee’s taste. Glass servers made from borosilicate glass are resistant to thermal shock and help avoid unwanted flavors. On the other hand, vacuum-insulated stainless steel carafes are excellent at maintaining coffee temperatures between 152°F and 163°F for up to 10 hours. Some high-end models even include an interior ceramic coating, which minimizes the metallic taste that can occur with standard stainless steel.
"The interior ceramic coating preserves your coffee's flavor by reducing the transfer of odors and tastes common with stainless steel alone."
- Hario
Beginner-Friendly Design
Coffee servers are simple to use, even for beginners. Many glass servers are designed to work seamlessly with popular pour-over drippers like the Hario V60 or Kalita Wave, allowing you to brew directly into them. To get the best results, preheat your server with hot water before brewing to maintain a consistent temperature. After brewing, a gentle swirl helps mix the layers of coffee for a more balanced flavor.
Materials and Build Quality
Coffee servers are typically made from glass or stainless steel. Glass servers, such as the Hario V60 Range Server, allow you to see your brew and are often microwave-safe, though they don’t retain heat as well. Stainless steel vacuum carafes, however, are highly durable and excel at keeping coffee hot without needing an external warming plate. Many feature double-walled designs, which keep the exterior cool while maintaining internal heat. These servers are a practical addition to any brewing setup.
Affordable Options for Beginners
Coffee servers are available at a wide range of prices, starting as low as $8.50 for basic glass models and going up to $50 for vacuum-insulated carafes. For those just starting, a simple glass server under $20 is a budget-friendly choice that pairs well with most pour-over setups. This makes it an accessible option for anyone looking to improve their home brewing experience.
sbb-itb-ed7145d
7. Filter Papers
How It Improves Coffee Flavor
Filter papers play a key role in enhancing coffee flavor by separating the grounds from the water while trapping oils and fine particles that can make your coffee taste bitter. The result? A cleaner, brighter cup that brings out subtle aromatics and acidity.
"Paper filters have a reputation for giving your cup of coffee a cleaner and more vibrant flavor when compared to filters made from other materials, such as cloth and metal."
- Perfect Daily Grind
The thickness of the filter paper also matters. For instance, Chemex Bonded Filters are 20% to 30% thicker than standard ones, which helps remove even the smallest particles and oils for exceptional clarity. On the other hand, thinner papers let more oils through, giving the coffee a richer body but less clarity.
Ease of Use for Beginners
Before brewing, always rinse the filter with hot water. This step removes any papery taste and preheats your brewing vessel. For beginners, oxygen-bleached (white) filters are a convenient choice since they require less rinsing compared to unbleached (brown) filters, which can sometimes add unwanted flavors.
It’s also important to match the filter shape to your brewing device. Use conical filters for brewers like the V60 or Chemex, and flat-bottom filters for options like the Kalita Wave. These pairings help control water flow and ensure proper extraction.
Build Quality and Materials
Filter papers are made from fibers such as softwood, hardwood, bamboo, or abaca. Bamboo and abaca fibers, which are longer, create more porous filters that allow some oils to pass through, while eucalyptus fibers, being shorter, result in tighter filtration for a cleaner cup. Paper thickness typically ranges from 0.15mm to 0.28mm. Thicker papers slow water flow, which enhances clarity, while thinner ones allow faster flow and a fuller-bodied brew. Knowing these differences can help you pick a filter that suits your brewing style and budget.
Price Range for Entry-Level Users
Filter papers are among the most budget-friendly brewing tools. For beginners, Melitta cone filters are a great starting point, priced at just $3.99 per pack. Mid-tier options like Hario V60 filters cost roughly $6.39, while Kalita Wave filters are around $8.90. If you’re looking for premium quality, Chemex Bonded Filters are available for about $10.45 per pack. For those just starting out, grocery store cone filters in sizes #2 or #4 are an affordable and practical option for many entry-level brewers.
8. Coffee Storage Container
Storing your coffee properly is just as important as having the right brewing gear. Without proper storage, even the best beans can lose their flavor over time.
How It Improves Coffee Flavor
Exposure to oxygen can ruin your coffee's flavor by oxidizing the beans. A good storage container protects your coffee from light, moisture, air, and heat. While whole beans taste best within 14 days of roasting, improper storage can strip them of nearly all flavor in 6 to 9 months.
The top-performing containers do more than just seal - they actively remove air. Look for "air-less" options with plunger lids that push oxygen out. Vacuum-sealed canisters can extend the shelf life of your beans by up to 50%. Some models even have one-way CO₂ valves, which let freshly roasted beans release gas without letting oxygen sneak back in.
"If oxygen is the enemy of coffee freshness, then it stands to reason that a vacuum-sealed container would be the ideal coffee storage vessel." - Jesse Porter, Beverage Writer, The Spruce Eats
Ease of Use for Beginners
For those new to coffee storage, choose containers that give clear feedback when sealed, like a satisfying "swoosh" sound. Many models also come with date trackers, which are helpful for keeping tabs on when your beans were roasted or purchased.
Skip the fridge or freezer - cold storage can lead to condensation and unwanted odors that harm your coffee. Instead, store your container in a cool, dry spot like a pantry. If you prefer glass containers, make sure to keep them in a dark cupboard to avoid exposure to light.
Build Quality and Materials
High-quality containers often use 18/8 stainless steel, which is durable, safe for food, and resistant to rust. Ceramic containers are another great option, offering excellent protection from light and a stylish look, though they’re more fragile. Glass containers let you see your beans but require careful placement away from light sources.
To keep your container in top shape, hand-wash it to protect seals and finishes. Containers with rubber or silicone bases are a smart choice - they stay put and don’t slide around. This small but mighty tool works alongside your grinder and scale to help you enjoy every bit of flavor your beans have to offer.
Price Range for Entry-Level Users
You can find budget-friendly options for as little as $9 to $15. For example, the Rubbermaid Brilliance airtight container costs about $9.39. Mid-range options with handy features like date trackers fall between $16 and $25, such as the Veken Coffee Canister, which costs $21.99 and boasts a 4.8/5-star rating from over 10,400 reviews.
If you’re interested in vacuum-sealing or air-displacement technology, expect to pay $30 to $45. The Airscape Stainless Steel Canister is priced at around $30.36 with a 4.8/5-star rating from over 7,300 reviews. Another popular choice, the Fellow Atmos Vacuum Canister, costs approximately $39.95. For beginners, the $16 to $25 range offers a great mix of features and affordability.
9. Timer
How It Improves Coffee Flavor
When brewing coffee, the extraction happens in stages: first, the acids are drawn out, followed by the sugars, and finally, the bitter compounds. Using a timer helps you hit that sweet spot - stopping the process when just the right amount of sugars have been extracted, avoiding the bitterness that comes with over-extraction. Without proper timing, you risk either under-extracting (leaving your coffee sour) or over-extracting (making it overly bitter).
Each brewing method has its own ideal timing. For instance, a V60 takes about 3 minutes, a French Press needs 4 minutes, and a Chemex ranges between 4 to 5 minutes, including a 30-second bloom phase. By timing these steps consistently, you can replicate a great cup every time and easily identify what might be going wrong if the flavor is off.
"If you make a coffee that you like, it is important to know the coffee to water ratio and the total brew time irrespective of the brew method you use."
- Pull & Pour Coffee
Ease of Use for Beginners
For beginners, timing starts the moment the first drop of water hits the coffee bed. Begin by pouring 10–15% of your total water and let it bloom for 30 seconds before continuing. If your total brew time is too fast or too slow compared to the recommended time, tweak your grind size instead of adjusting your pouring speed.
Digital timers with simple keypads make the process much easier for beginners. Features like backlit displays and ergonomic designs enhance usability. Many beginners prefer scales with built-in timers, such as the Hario Drip Scale, which simplifies the setup and ensures precision. This level of control allows even newcomers to achieve consistent results across various brewing methods.
Build Quality and Materials
A high-quality timer is built to last. Look for water-resistant designs and flush-mounted screens that prevent coffee grounds from sneaking into crevices. Digital timers tend to be more accurate than their mechanical counterparts. For example, the ThermoWorks TimeStick Trio is a favorite due to its water-resistant casing, portability, and lock feature that prevents accidental resets. Another reliable option is the Taylor Super-Loud Timer, which can handle accidental drops without breaking.
Price Range for Entry-Level Users
Standalone timers are budget-friendly, with basic models priced between $7 and $14, like the Antonki 2-Pack for $7 or the Samshow Digital Timer for $14. Mid-range options, such as the OXO Good Grips Triple Timer at $29 or the ThermoWorks TimeStick Trio at $35, offer more features and durability. If you prefer a multitasking tool, coffee scales with built-in timers start around $20, while high-end models like the Acaia series can cost upwards of $129. Investing in a reliable timer ensures you can consistently recreate your perfect cup of coffee.
10. Milk Frother
A milk frother is the finishing touch for your coffee setup, bringing café-style milk textures straight to your kitchen. It’s the tool that can elevate your morning brew into a barista-level experience.
How It Enhances Coffee Flavor
Milk frothers work by aerating milk, creating either thick foam for cappuccinos or silky microfoam for lattes. Manual frothers are particularly effective at maintaining a rich, undiluted milk flavor since they avoid adding water vapor. To get the best taste, keep your milk below 154°F - this prevents the proteins from breaking down and altering its flavor. Instead of overheating your milk, preheating your coffee mug can help maintain the perfect temperature for your drink.
User-Friendly Options for Beginners
If you’re new to frothing, handheld wands are a great place to start. Simply heat your milk separately, then froth it in about 30 seconds. Always use fresh milk and swirl it gently to achieve a smooth, consistent texture. For convenience, look for handheld frothers with USB-C rechargeable batteries - this saves you from dealing with disposable AA batteries. Prefer a hands-off approach? Automatic jug frothers might be your best bet. These devices heat and froth the milk at the same time with just one button. Keep in mind, though, that they often produce thicker foam, which may not be ideal for creating latte art.
Build and Material Considerations
Most beginner frothers feature stainless steel whisks, which are durable and easy to clean. Budget-friendly options like the IKEA Produkt offer lower power output, giving you more control during frothing. For those aiming for professional-quality results, the Subminimal NanoFoamer uses a screen design to eliminate large bubbles, producing refined microfoam - though it does require some practice to master. Automatic jug frothers often include non-stick interiors for easier cleaning. When shopping, look for models with wide basins that are either dishwasher-safe or easy to hand-wash.
"Cheap gadget" that "brought so much pleasure to those gloomy mornings."
- Megan Steintrager, Associate Editorial Director of Serious Eats, on the Zulay Kitchen handheld frother
Price Range for Beginners
Handheld frothers are budget-friendly, with basic models costing between $3 and $15. The IKEA Produkt is a popular choice in this category. Mid-range options like the Zulay Kitchen frother, priced between $20 and $50, often come with sturdier builds and rechargeable batteries. If you’re considering automatic jug frothers, entry-level models like the Instant Pot 4-in-1 start at around $27, while premium options from brands like Nespresso or Breville can cost anywhere from $100 to $200. Even at the entry level, you can find a frother that delivers great performance.
Comparison Table
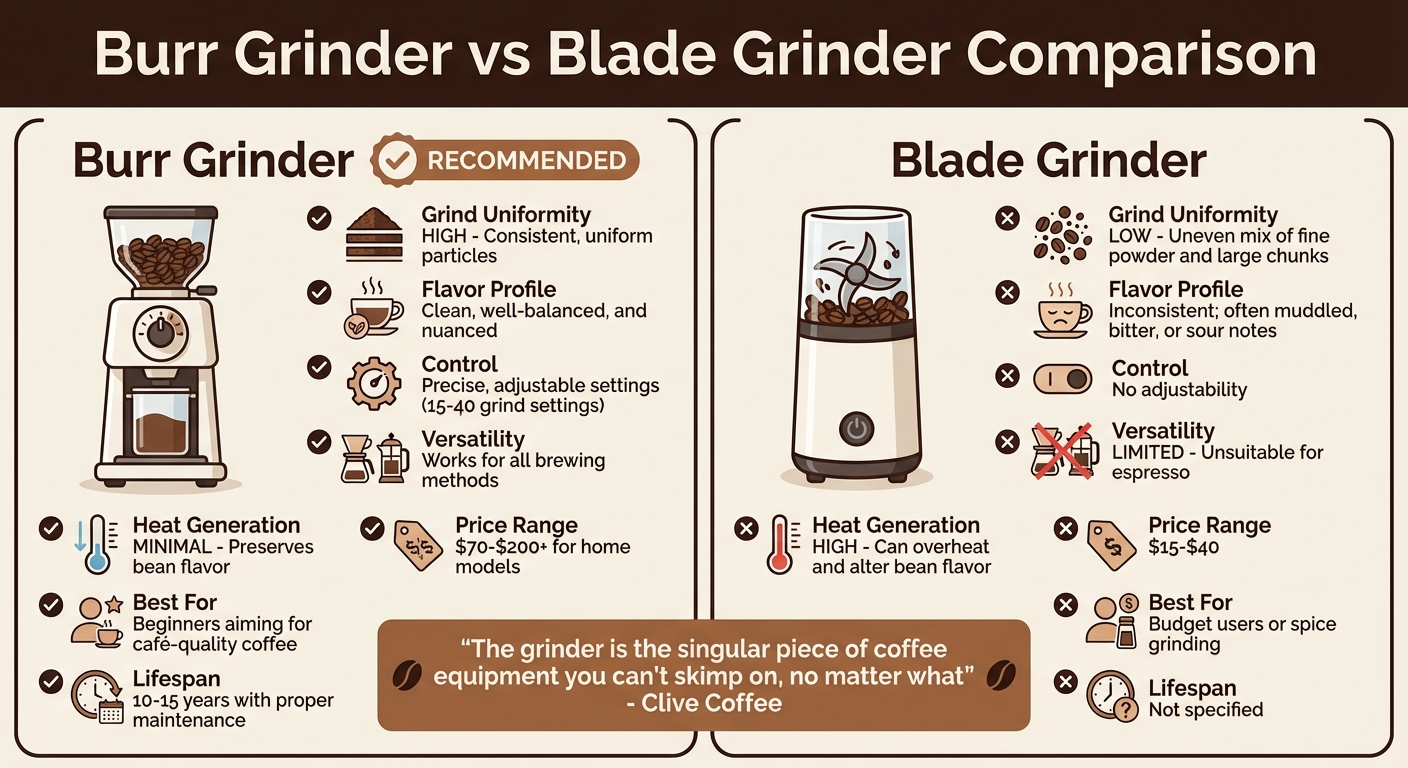
Choosing the right grinder is a game-changer when it comes to brewing consistent, flavorful coffee. The grind size directly impacts how well flavors are extracted, and the table below breaks down the key differences between two popular grinder types.
| Feature | Burr Grinder | Blade Grinder |
|---|---|---|
| Grind Uniformity | High – delivers consistent, uniform particles | Low – produces an uneven mix of fine powder and large chunks |
| Flavor Profile | Clean, well-balanced, and nuanced | Inconsistent; often leads to muddled, bitter, or sour notes |
| Control | Precise, adjustable settings | Lacks any real adjustability |
| Versatility | Works for a wide range of brewing methods | Limited, unsuitable for espresso |
| Heat Generation | Minimal, preserving bean flavor | Can overheat and alter the flavor of the beans |
| Price Range | $70–$200+ for home models | $15–$40 |
| Best For | Beginners aiming for café-quality coffee | Budget users or spice grinding |
This table makes it clear why burr grinders are the go-to choice for coffee enthusiasts, especially beginners. Experts strongly discourage using blade grinders for coffee. As Clive Coffee explains, "The grinder is the singular piece of coffee equipment you can't skimp on, no matter what".
For instance, a manual hand burr grinder like the Hario Ceramic Mill (priced around $46) offers a level of grind consistency that blade grinders simply can’t match. Whether you’re brewing a French press or a pour-over, a burr or manual hand grinder ensures better, more consistent results.
"Producing a truly even grind with a blade grinder is nearly impossible, and making sure it comes out the same way every time is actually impossible."
Conclusion
Creating a great coffee brewing setup doesn't have to be complicated. With just a few carefully selected tools, you can elevate your home brewing game and enjoy a consistently delicious cup. Each piece of equipment - from the grinder to the frother - has its own role in crafting the perfect brew.
To get started, focus on the essentials: a brewer, a digital scale, a gooseneck kettle, and a burr grinder. These four tools are the backbone of any quality home brewing setup. As Mike Greene from Prima Coffee says, "The fastest way to learn will be to brew, taste, adjust, and record results while you're getting a handle on your new gear." Start with one brewing method, master it, and gradually expand your setup as you refine your preferences. This approach not only simplifies the process but also sets the stage for experimenting with more advanced techniques.
Manual brewing offers the freedom to tweak variables like grind size, water temperature, and brew time to suit your taste. For example, adjusting the grind coarseness can help balance bitterness, while a finer grind can reduce sourness. And don’t overlook water quality - it makes up over 98% of your coffee. Use filtered water, store your beans in an airtight container, grind them fresh before brewing, and aim for water temperatures between 195°F and 205°F for the best extraction. These small steps can significantly improve the flavor of every cup.
Whether you prefer the bold richness of a French press or the bright clarity of a pour-over, your setup is the key to unlocking new flavors. Take your time to experiment, adjust one variable at a time, and enjoy the journey of discovering what makes your perfect cup.
FAQs
What’s the first coffee tool a beginner should buy?
For anyone just starting out, the first piece of equipment you’ll want is a burr grinder. Why? Because freshly ground coffee isn’t just a small upgrade - it’s a game-changer for flavor. A burr grinder ensures a consistent grind size, which is key for brewing great coffee, whether you’re using a French press, a pour-over, or a drip coffee maker.
If you’re looking for an affordable option, the Hario Mini Mill (priced around $30) is a great choice for beginners. For those wanting to step up a bit, the Baratza Encore is a popular mid-range pick that’s easy to use and highly reliable. Both options will elevate your coffee experience far beyond what you’d get using pre-ground coffee or a blade grinder. A quality grinder is truly the foundation of better coffee!
Why does grind size matter when brewing coffee?
Grind size is a game-changer when it comes to how your coffee tastes. It controls how fast water extracts flavors from the coffee grounds. When the grind size is consistent, you get a balanced extraction, which means a flavorful and satisfying cup. But if the grind is uneven - something that blade grinders often cause - you might end up with over-extracted coffee (bitter) or under-extracted coffee (sour), which can throw off the taste.
Each brewing method works best with a specific grind size. For instance, espresso calls for a fine grind to allow for quick extraction, while a French press works better with a coarse grind to suit its slower brewing process. By tweaking the grind size, you can adjust your coffee’s acidity, sweetness, and body, giving you the power to perfect your cup every time.
Why should I use a gooseneck kettle for making pour-over coffee?
A gooseneck kettle is a must-have for pour-over coffee enthusiasts. Its design lets you control both the flow and direction of the water with precision, which is essential for evenly saturating coffee grounds. This careful saturation leads to a balanced extraction, bringing out the best flavors in your brew.
Many gooseneck kettles also come with adjustable temperature settings, allowing you to fine-tune the water temperature - a critical element for consistently brewing great coffee. On top of that, their ergonomic design ensures they’re comfortable to use, making the brewing process smooth and enjoyable, whether you’re a beginner or a seasoned coffee aficionado.