
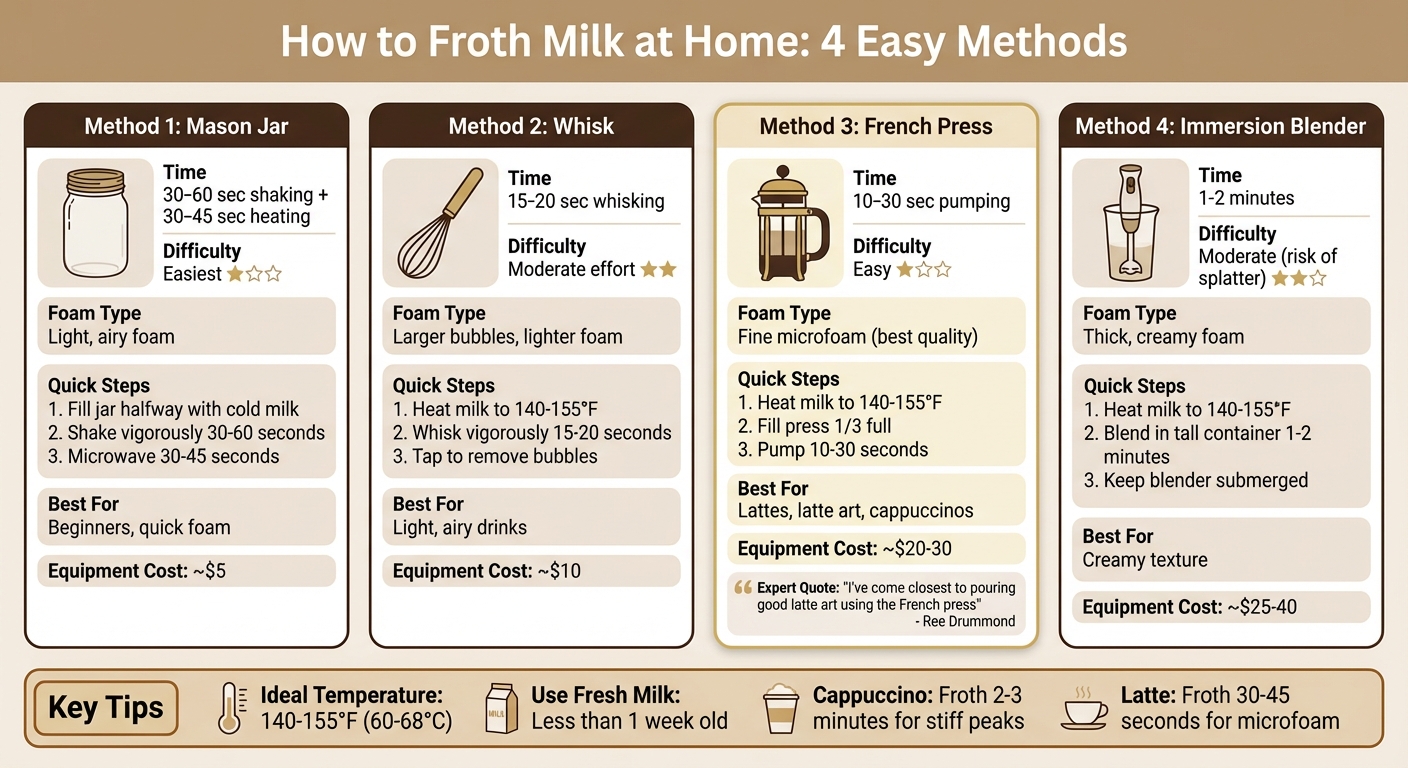
You don’t need expensive tools to froth milk like a pro. With everyday kitchen items like a mason jar, whisk, French press, or immersion blender, you can create creamy foam for your coffee. Here’s a quick breakdown of methods:
- Mason Jar: Shake cold milk in a jar, microwave it, and you’re done.
- Whisk: Heat milk, whisk vigorously, and enjoy light foam.
- French Press: Pump warm milk for silky microfoam.
- Immersion Blender: Blend milk in a tall container for smooth results.
For the best foam, use whole milk, heat it to 140–155°F, and avoid overheating. Non-dairy options like oat or soy milk work too but need careful handling. Ready to upgrade your coffee? Let’s dive into the details.
4 Methods to Froth Milk at Home Without a Machine
How to Froth Milk Without Machine at Home - How to Froth Milk for Lattes Without a Machine!
sbb-itb-ed7145d
Shake Milk in a Mason Jar
If you're looking for a simple way to froth milk at home, the mason jar method is a great place to start. All you need is a jar with a tight-fitting lid, and you're ready to create foam for your coffee drinks. This method works by shaking air into the milk, making it a quick and easy option for beginners.
Step-by-Step Process
- Pour ½ cup of cold milk into a mason jar, filling it only halfway to leave room for the milk to expand.
- Secure the lid tightly and shake the jar vigorously for 30–60 seconds until the milk becomes frothy and increases in volume.
- Remove the lid and microwave the jar on high for 30 to 45 seconds. This step helps stabilize the foam. As Lisa McManus from America's Test Kitchen notes:
"The foam will rise and become more stable as the milk heats."
No microwave? No problem. You can heat the milk in a saucepan until it reaches 140–155°F, then pour it into the jar and shake. To protect your hands from the heat, wrap the jar in a dish towel while shaking.
Once heated, tap the jar gently on the counter to pop any large bubbles. Swirl the milk to create a smooth, uniform texture before pouring it into your coffee.
Tips for Best Results
- Use a pint-sized (16 oz) mason jar when frothing ½ cup of milk. This ensures enough space for the milk to expand without the lid popping off.
- For better aeration, toss in a shaker ball or the spring from a cocktail strainer before shaking.
- Always use fresh milk. Milk that’s been open for more than a week may not foam as well because the proteins break down over time.
- If you want more control when pouring, transfer the frothed milk to a small pitcher first. This makes it easier to remove any remaining large bubbles and gives you better precision when adding it to your coffee.
With this technique, you can enjoy café-style foam right at home, no fancy equipment needed! However, if you find yourself making lattes daily, a handheld electric whisk can save time and produce even silkier results.
Whisk Milk by Hand
All you need to froth milk by hand is a simple whisk and a saucepan. While this method takes a bit more elbow grease than using a mason jar, it offers you full control over both the heating and frothing process. The result? Larger bubbles that create a lighter, airier foam.
How to Whisk Milk
Start by heating your milk in a saucepan over medium heat, aiming for a temperature of 140–155°F (60–68°C). Once the milk is warmed, you can whisk it directly in the saucepan or transfer it to a tall container or mixing bowl. For best results, tilt the container slightly to help incorporate air. Whisk vigorously for about 15–20 seconds until the milk doubles in size. To refine the texture, tap the container on the counter to pop any large bubbles, and give it a gentle swirl to create a smoother, pourable consistency. This straightforward approach works well when you’re short on equipment or just need a simple, lighter foam.
When to Use This Method
This method is perfect when you don’t have specialized frothing tools but still want a decent foam. With just a basic balloon whisk - usually priced around $9.99 - you can achieve satisfactory results. Since this technique naturally produces larger bubbles, it’s best suited for drinks that benefit from a light, airy foam rather than a denser microfoam. Just be careful not to let the milk boil, as overheating can ruin the proteins that help the foam hold its shape.
Pump Milk in a French Press
If you already have a French press for brewing coffee, you’re in luck - it’s one of the best manual tools for making café-style microfoam. Unlike the jar method, which creates large, airy bubbles, the French press delivers fine foam with tiny, even bubbles - perfect for lattes and cappuccinos. Here’s how to use it to achieve that silky microfoam.
Step-by-Step Instructions
- Heat the milk: Warm your milk in a saucepan to a temperature of 140–155°F (60–68°C). It should be steaming but not boiling.
- Pour into the French press: Transfer the warmed milk into a clean French press, filling it only about one-third full. This leaves room for the milk to expand as you froth.
- Pump the plunger: Insert the plunger and pump it using quick, short strokes for about 10–30 seconds, or until the milk has roughly doubled in volume.
- Remove large bubbles: Tap the base of the French press on the counter to pop any large bubbles, then swirl the milk gently to achieve a smooth, even texture.
- Let it rest: Allow the foam to stabilize for about a minute before pouring it into your coffee.
"I've come closest to pouring good latte art using the French press." – Ree Drummond, The Pioneer Woman
Why the French Press is Great for Frothing
The French press stands out for its ability to create consistent microfoam, making it ideal for latte art. What sets it apart is the fine mesh screen on the plunger, which forces air into the milk while breaking down larger bubbles into smaller ones. This process mimics the kind of foam professional steam wands produce - without the need for pricey equipment.
The science behind it is simple: the protein molecules in the milk trap air in the tiny bubbles, giving the foam that smooth, velvety texture. Just make sure your French press is thoroughly cleaned beforehand; leftover coffee grounds can sneak into your foam and ruin the texture. The only downside? Cleaning the mesh filter can be a bit of a chore after each use.
Froth Milk with an Immersion Blender
Using an immersion blender (also known as a stick blender) is another great way to create frothy milk at home. This method delivers finer foam than the jar technique and is quicker than manually whisking. However, it does require a bit of caution to avoid making a mess in your kitchen.
How to Use an Immersion Blender
Begin by heating your milk to a temperature of 140–155°F (60–68°C) - hot enough to steam, but not boiling. Pour the milk into a tall, narrow container, filling it about one-third full. Before turning on the blender, make sure the head and blades are fully submerged in the milk. This helps avoid splattering hot milk all over your counter.
Set your immersion blender to a low speed and blend for 1–2 minutes until you see thick, creamy foam forming. Holding the container at a slight angle can help incorporate air more effectively. Once you’re happy with the foam’s consistency, make sure to turn off the blender before lifting it out of the milk to avoid the dreaded "spitting" effect. To finish, tap the container on the counter a few times to pop any large bubbles, then gently swirl the milk to smooth out the texture.
Tips for a Cleaner and More Even Froth
The trickiest part of using an immersion blender is managing splatter. Food blogger April Anderson from Girl Gone Gourmet offers this advice:
"If you use an immersion blender (or stick blender), the blender head will need to be completely immersed in the milk, so use a tall, narrow container. The tall sides will prevent the milk from splashing out".
A tall, narrow container is essential not just for containing the milk but also for ensuring even frothing. Move the blender slowly and steadily to aerate the milk properly. Avoid moving the blender erratically, as this can lead to uneven foam and unnecessary mess.
Finally, always opt for fresh milk. Milk that’s been open for too long may not foam well because its proteins start to break down over time.
Tips for Getting the Right Froth
Now that you’re familiar with different frothing techniques, it’s time to fine-tune your method to suit your favorite coffee drink.
Matching Methods to Your Drink
The type of foam you need depends on the coffee you’re making. Cappuccinos call for thick, airy foam with stiff peaks, while lattes require silky, pourable microfoam. Each frothing method - whether shaking, whisking, or using a French press - can be adjusted to achieve the right consistency. For cappuccinos, froth vigorously for 2–3 minutes with your preferred method, like shaking a jar, pumping a French press, or whisking by hand. For lattes, aim for 30–45 seconds to create microfoam that blends smoothly with espresso. If you’re into latte art, a French press is especially handy because its narrow spout helps you pour with precision.
Cold vs. Warm Milk Frothing
Warm milk is best for hot coffee drinks because the heat stabilizes air bubbles by setting the milk proteins. For optimal results, heat the milk to 140°F–155°F. Be careful not to exceed 158°F (70°C), as this can denature the proteins and cause the foam to collapse.
For iced drinks, cold milk froths better. It takes about 1–1.5 minutes to create cold foam, compared to just 30–45 seconds for warm milk. A handheld frother works particularly well with cold milk. As Chi Sum Ngai, co-founder of Coffee Project NY, explains:
Cold temperature allows you a longer time to texture the milk.
Frothing Non-Dairy Milk
Frothing non-dairy milk requires a gentler approach and careful temperature control. Look for "Barista Edition" plant-based milks, as these are designed with added stabilizers and higher fat content to mimic dairy foam.
- Oat milk: Produces creamy microfoam when heated to 150°F–155°F (65°C–68°C). Avoid overworking it, especially with a French press; around 25 pumps should do the trick to prevent sliminess.
- Soy milk: Its higher protein content (around 2.7%) makes it great for stable foam, but it can curdle if heated above 140°F (60°C).
- Almond milk: With less protein (about 0.4%), it creates lighter, thinner foam. Heat it to about 130°F (54°C) for the best results.
Here’s a quick guide to help you choose the right approach:
| Milk Type | Ideal Frothing Temp | Best For | Key Consideration |
|---|---|---|---|
| Oat (Barista) | 150°F–155°F (65°C–68°C) | Lattes, creamy texture | Limit agitation to avoid sliminess |
| Soy | 140°F (60°C) | Cappuccinos, stable foam | High protein; may curdle if overheated |
| Almond | 130°F (54°C) | Light foam, nutty flavor | Low protein means less stable foam |
With these tips, you’re ready to tackle common frothing challenges and elevate your coffee game.
Fixing Common Frothing Problems
Once you've got the hang of frothing, tackling common issues is the next step to achieving that perfect, velvety foam. Whether you're using a jar, whisk, French press, or immersion blender, these tips can help fine-tune your frothing game.
Getting Rid of Large Bubbles
Hand-frothing can sometimes result in oversized bubbles that disrupt the smooth texture of your foam. To fix this, gently tap your frothing container on the counter to pop the larger bubbles. Then, swirl the milk to blend the foam into a smoother, more consistent texture. As The Pioneer Woman suggests:
The froth can benefit from being groomed: tap your frothing container on the counter to pop large air bubbles, then swirl the milk to make it more uniform.
If you're using a mason jar, transferring the milk to a pitcher before tapping and swirling can give you better control. For handheld frothers, keeping the wand submerged is key. This helps create a steady whirlpool instead of splashing or forming large bubbles. Coffee expert Julia Bobak advises:
If [the handheld frother is] too close to the surface of the milk, you'll end up with large bubbles and splashing.
Once you’ve tackled the bubbles, it’s time to focus on avoiding overheating.
Preventing Overheating
Overheating milk can ruin both its flavor and the texture of your foam. The ideal temperature range for frothing is between 140°F and 155°F. Going above 160°F damages the proteins that stabilize foam, leading to poor results. If you don’t have a thermometer, heat the milk until the container feels hot but not burning to the touch. Stir constantly when heating on the stove to avoid scalding. Chi Sum Ngai, co-founder of Coffee Project NY, shares this tip:
Steam the milk until it reaches about 140 to 160 degrees Fahrenheit. If you don't have a thermometer, steam just until the bottom of the pitcher is too hot to touch.
The moment you notice the milk starting to simmer, remove it from the heat immediately. A rolling boil will ruin the foam's structure.
Keeping Foam from Deflating
Frothed milk tends to collapse quickly, but letting it rest for 30–60 seconds can help stabilize it. Fresh milk works best for frothing, as older milk loses the protein structure needed to hold bubbles. Additionally, tapping and swirling the foam can eliminate unstable, larger bubbles. For non-dairy options like oat milk, avoid over-frothing. If you're using a French press, limit yourself to about 25 pumps, or if using a handheld frother, keep it to around 20 seconds. This helps maintain a stable, long-lasting foam.
Conclusion
You now have four simple ways to froth milk at home: the mason jar, French press, whisk, and immersion blender. The best part? None of these require pricey equipment. The mason jar method stands out for its ease and accessibility, while the French press offers a standout option for creating microfoam perfect for latte art. Plus, it doubles as a coffee brewing tool. As Ree Drummond puts it:
"If I were to recommend one method, it would be the French press method. It creates beautiful foam... and it isn't a single-purpose tool."
These techniques are a great starting point for enhancing your coffee routine.
To get the best results, aim to heat your milk to 140°F–155°F and adjust your frothing time based on your drink. For a latte, 30–45 seconds of frothing should do the trick, while cappuccinos benefit from a longer froth of 2–3 minutes. Experiment with these methods, and you'll soon be crafting café-quality foam at home. The key is finding what works best for your tools and favorite drinks, paired with the right temperature and fresh milk.
FAQs
What’s the easiest way to froth milk at home for latte art?
To make latte art at home, achieving that smooth, glossy microfoam doesn’t require fancy equipment - just a few basic tools you probably already own. A French press is a fantastic option. Simply heat your milk (but don’t let it boil), then pump the plunger up and down for about 20–30 seconds until it transforms into a creamy froth. No French press? No problem! You can use a whisk or even shake warm milk in a jar and let it rest for a smoother texture.
For the creamiest results, whole milk is your best bet because of its higher fat content. Prefer a plant-based alternative? Oat milk works wonderfully too. With a bit of practice, you’ll be crafting foam that looks and tastes like it came straight from a café. Perfect for lattes, cappuccinos, or just impressing yourself!
Can I froth non-dairy milk, and how does it compare to regular milk?
Yes, you can froth most non-dairy milks, but the results can vary depending on the type you choose. Oat milk is a standout option because its natural sugars and proteins create a creamy, stable foam that's very similar to what you'd get with whole milk. Many brands even offer special "barista" versions that are specifically designed to froth better.
Other options, like soy milk, also froth well thanks to their protein content, though the flavor might differ slightly. On the other hand, almond, coconut, and rice milks tend to produce lighter, airier foam that doesn’t hold up as long. These are great choices for drinks where a more delicate froth works just fine.
If you're comparing to dairy, whole milk wins for the richest and creamiest foam because of its balance of fat and protein. To get the best foam, start with cold milk (below 40°F), heat it to about 140°F, and use tools like a whisk, a jar, or a French press - this method works for both dairy and non-dairy milks!
How can I keep my frothed milk from losing its foam quickly?
To ensure your frothed milk stays stable, begin with fresh, cold milk and heat it to a temperature between 140–155°F (60–68°C) before frothing. Heating it beyond this range can damage the proteins that are essential for forming stable foam. Once frothed, lightly tap the container on the counter and give it a swirl. This helps eliminate larger bubbles and results in a smooth, velvety texture. Following these steps will make your foam last longer and keep it consistent for your favorite beverages.