
Microfoam makes your latte smooth, creamy, and perfect for latte art. It's created by incorporating tiny air bubbles into steamed milk, resulting in a glossy, velvety texture that blends seamlessly with espresso. To make microfoam at home, you'll need the right tools, proper technique, and practice. Here's a quick summary:
- Start with cold whole milk for the best texture and sweetness.
- Use a steam wand for precise control or a handheld frother for convenience.
- Heat milk to 140°F–155°F to enhance its natural sweetness without scalding.
- Create a vortex while steaming to break down bubbles for a smooth finish.
- Always tap and swirl the milk after steaming for a glossy, paint-like consistency.
Mastering this technique not only improves your coffee's taste but also allows you to create beautiful latte art. Ready to step up your coffee game? Let's dive in.
Milk Steaming for Beginners: The ONE Technique for Perfect Microfoam (Vortex Method)
What Is Microfoam?
Microfoam is created by infusing steamed milk with tiny, uniform bubbles so small they’re almost impossible to see. The result? A glossy, smooth liquid texture that’s worlds apart from the dry, fluffy foam often found sitting on top of a drink. Instead, microfoam integrates fully with the milk, giving your coffee a creamy consistency from start to finish. This texture elevates both the flavor and appearance of your beverage.
Characteristics of Microfoam
One of the hallmarks of great microfoam is its shiny, reflective surface, often described as having a "wet paint-like sheen." If you can spot individual bubbles, the foam is likely too dry or stiff. Proper microfoam should appear as a smooth, seamless liquid. When poured, it flows continuously, making it perfect for creating latte art. The texture feels silky and velvety on the palate, enhancing the overall coffee experience. During steaming, the milk expands by about 20% to 30% as air is incorporated, but the bubbles remain so tiny that they’re hardly noticeable.
How Microfoam Affects Your Coffee
Microfoam does more than just look good - it transforms both the taste and texture of your coffee. When milk is steamed to an ideal temperature of 140°F to 155°F, its natural sugars caramelize slightly, creating a sweeter, richer flavor that complements the boldness of espresso. Because microfoam blends seamlessly with the espresso instead of floating on top, every sip delivers a balanced mix of coffee and milk. This smooth consistency is also key for latte art, as it allows for intricate designs like hearts, rosettas, and tulips to stand out beautifully against the espresso crema.
Tools for Frothing Milk
The tool you use to froth milk plays a big role in achieving that silky, velvety microfoam. Steam wands are often considered the go-to choice, especially for professionals, as they combine heating and frothing in one smooth process. But there are other tools available for home baristas and casual coffee drinkers. Here's a breakdown of the most common frothing tools and what you can expect from each.
Steam Wands
Steam wands are the top choice for creating high-quality microfoam. Found on espresso machines, they use pressurized steam to heat and aerate milk while creating a vortex that evenly distributes tiny bubbles. This results in smooth, uniform foam that’s perfect for latte art.
For home espresso machines, a pressure range of 1–1.5 bars is ideal. This lower pressure compared to commercial machines gives you more control and time to perfect the texture before the milk reaches the optimal temperature of 140°F to 145°F [8][10]. Home models are also more forgiving, making them great for practicing technique [11].
Tip: Always purge the steam wand before and after use by releasing a quick burst of steam. This clears out condensation and prevents milk residue from building up [8].
Handheld Frothers
Handheld frothers are a budget-friendly and convenient option if you don’t own an espresso machine. These battery-powered whisks can froth milk in about 20 to 30 seconds. However, they don’t heat the milk, so you’ll need to preheat it to around 140°F for the best results [9].
While handheld frothers are easy to use, the foam they produce tends to be lighter, with larger bubbles. This makes it less ideal for intricate latte art but perfectly fine for everyday drinks. If you’re after simplicity and affordability, handheld frothers are a solid choice.
Additional Frothing Options
Other tools, like manual pump frothers and French presses, rely on vigorous plunging to create foam. These methods produce thicker, denser foam, making them a good fit for cappuccinos [11].
For those seeking consistency without the learning curve of a steam wand, automatic electric pitchers are a great alternative. They heat and froth milk at the same time, offering a quick and easy solution. While they may lack the fine texture control of a steam wand, they’re a hassle-free way to achieve reliable results [4].
Looking to upgrade your frothing game? Check out premium accessories at Fwing Coffee.
sbb-itb-ed7145d
How to Froth Milk for Microfoam
5-Step Guide to Creating Perfect Microfoam for Lattes
Creating café-quality microfoam at home is easier than you might think. Here’s a step-by-step guide to help you achieve that silky, velvety texture every time.
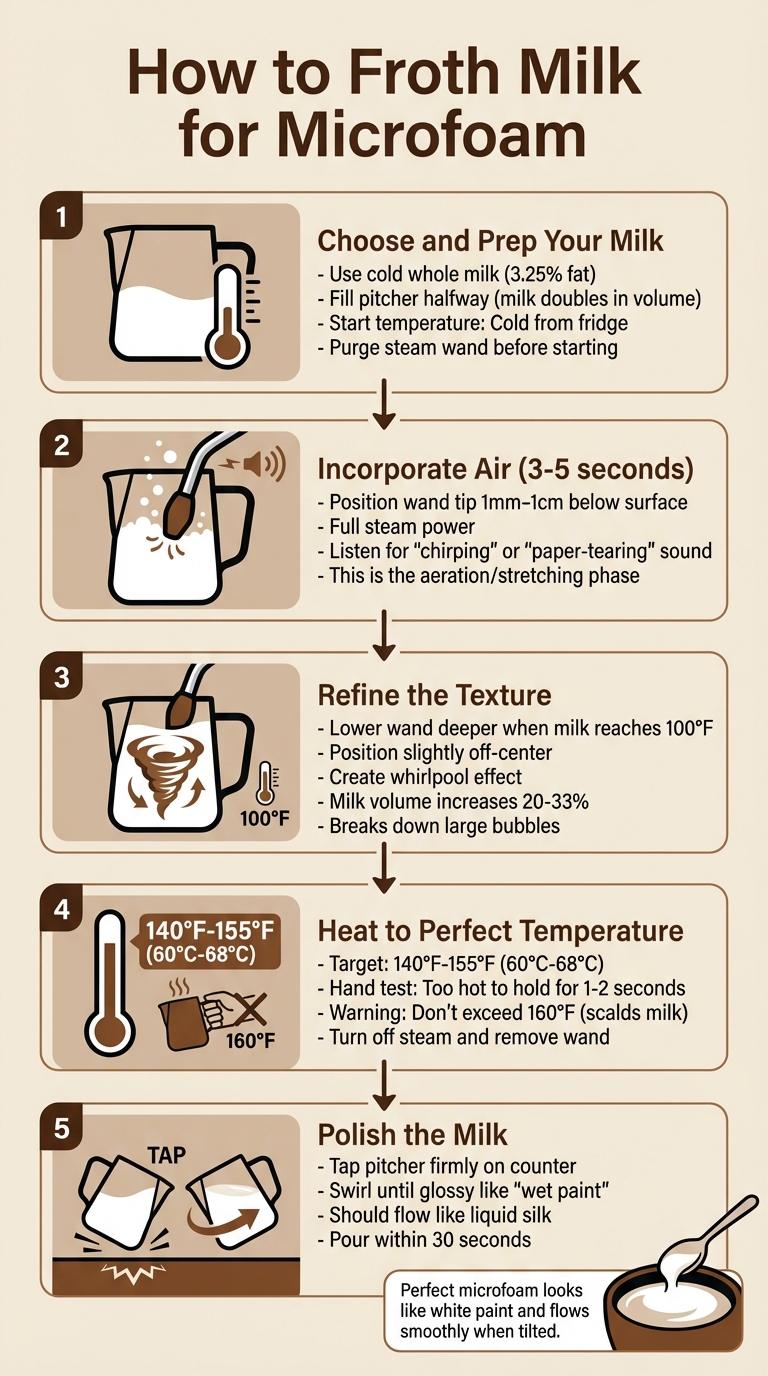
Step 1: Choose and Prep Your Milk
Start with cold whole milk straight from the fridge. Whole milk, with its 3.25% fat content, provides the ideal balance of fat and protein for stable, creamy microfoam [1]. Cold milk is also better at holding smaller bubbles during the initial frothing stage, which is key for that smooth, silky texture [1]. Pour the milk into a cold stainless steel pitcher, filling it no more than halfway - remember, the milk will expand to nearly double its volume during frothing [6]. Before you begin, make sure to purge the steam wand.
Step 2: Incorporate Air Into the Milk
Position the steam wand tip just below the surface of the milk, around 1 mm to 1 cm deep [3]. Turn the steam on full power and listen for a soft "chirping" or "paper-tearing" sound - this means you’re adding air correctly [7]. This step, often called the stretching or aeration phase, should only last 3–5 seconds [7].
If you’re using a handheld frother instead, preheat your milk to about 140°F. Then, hold the frother’s whisk just below the surface at a slight angle, moving it in small circles to break down larger bubbles [1].
Next, it’s time to refine the texture.
Step 3: Refine the Texture
Once the milk reaches "blood warm" (around 100°F) or increases in volume by 20–33%, lower the steam wand tip deeper into the milk [2]. Position the wand slightly off-center to create a whirlpool effect. This spinning motion breaks down larger bubbles, transforming the milk into smooth microfoam [3]. You’ll know you’re doing it right when the milk spins evenly in the pitcher.
Keep an ear out for any unusual noises - screeching means the wand is too deep, while splattering indicates it’s too high [3].
Step 4: Heat to the Perfect Temperature
Continue the vortex motion until the milk reaches a temperature between 140°F and 155°F (60°C–68°C) [7]. This range is crucial. Milk proteins start to denature at 154°F, and going past 160°F can scald the milk, ruining its sweetness and foam structure [7]. If you don’t have a thermometer, try the hand test: place your palm on the pitcher’s side or bottom. When it feels too hot to hold for more than 1–2 seconds, you’ve hit the right temperature [7]. Turn off the steam and remove the wand immediately.
Step 5: Polish the Milk
After steaming, purge and wipe the wand right away to prevent milk residue from hardening. Then, give the pitcher a few firm taps on the counter to pop any large bubbles on the surface [7]. Swirl the milk until it looks glossy and flows like liquid silk [7].
"Perfect microfoam should look like white paint. When you tilt the pitcher, it should flow smoothly rather than slosh."
– James Wilson, Coffee Expert & Product Reviewer [1]
This final step ensures the foam and liquid are fully blended, giving you a uniform texture that’s perfect for pouring latte art.
Now that your microfoam is flawless, you’re ready to tackle common frothing challenges or explore premium coffee tools to elevate your home brewing. Check out Fwing Coffee for top-notch accessories!
Fixing Common Frothing Problems
If your steamed milk isn’t turning out as expected, these practical tips can help you achieve the perfect consistency.
Large Bubbles
If your milk is full of large bubbles instead of a smooth, silky texture, the steam wand might be too high or aerating for too long. To fix this, lower the wand tip just below the milk's surface for about 3–5 seconds, then submerge it slightly off-center. This creates a vortex that helps break down large bubbles into fine microfoam [2][1]. Tilting the pitcher and keeping the wand off-center promotes the rolling motion needed to properly mix air into the milk. After steaming, gently tap the pitcher on the counter a couple of times to pop any surface bubbles, then swirl the milk until it looks glossy.
Uneven Texture
A thick foam layer sitting on top of thinner milk usually means the milk wasn’t textured enough. This often happens when a proper vortex doesn’t form during steaming. To fix this, adjust the wand position after the initial aeration phase. Move the tip slightly off-center and lower it about 1 cm below the surface. This adjustment helps create a consistent spinning motion, which is essential for achieving smooth microfoam.
"Microfoam is what you get when... the barista is able to whip in air bubbles so small they're almost invisible and the resulting foam is creamy and smooth."
– Bryan De Luca, Founder, The Coffee Maven [5]
If the milk sloshes, it’s likely under-textured, while clumping suggests too much aeration. Properly steamed milk should flow like melted ice cream and have a glossy appearance, similar to freshly opened paint. Aim to pour it within 30 seconds of steaming for the best results.
Overheated or Thin Foam
Milk heated past 160°F loses the proteins that stabilize foam, resulting in scorched milk with a burnt flavor [1]. To avoid this, use a thermometer or the hand test: if the pitcher becomes too hot to hold for more than 1–2 seconds, stop steaming immediately. Thin foam often happens when there isn’t enough aeration at the start. Make sure the wand tip is just below the surface during the first 3–5 seconds, producing a gentle "chirping" sound [5]. Starting with cold milk straight from the fridge also gives you more time to texture it before it overheats.
"Never exceed 160°F or you'll scald the milk, creating a burnt taste and destroying the proteins."
– James Wilson, Coffee Expert [1]
Conclusion
Perfecting microfoam is all about a combination of the right technique, reliable equipment, and plenty of practice.
"Learning to froth milk properly is one of those skills that seems impossible at first, then suddenly clicks."
– James Wilson, Coffee Expert
Using high-quality tools - like pitchers, thermometers, and frothers from Fwing Coffee - can help you achieve consistent, café-level results right in your own kitchen.
Remember, temperature control and creating the right vortex are key to that glossy, velvety finish. While technique and good tools set the stage, it’s practice that truly makes the difference. Over time, you’ll build muscle memory, refine your timing during aeration, and even tune your ear to recognize the ideal frothing sound.
With dedication and the right tools, your homemade coffee can rival any café creation.
FAQs
What makes a steam wand better than a handheld frother for creating microfoam?
A steam wand gives you more control and precision when frothing milk, making it easier to create that silky, velvety microfoam prized in coffee shops. With a steam wand, you can adjust the temperature and aeration to produce tiny, consistent bubbles, resulting in a smooth texture that's perfect for latte art and premium espresso drinks.
On the other hand, handheld frothers tend to add air unevenly, often creating larger bubbles and a less uniform foam. While they’re handy for quick use, they fall short of delivering the professional-level results a steam wand can achieve. For those who want barista-quality microfoam, a steam wand is the way to go.
How do I know if my milk is overheated while frothing?
If your milk feels too hot to touch or starts emitting a scorched, burnt smell, it's a clear sign it’s overheated. The ideal temperature for frothing milk is between 140°F and 150°F. When milk surpasses this range, it can lose its natural sweetness, and the microfoam may turn stiff or even separate.
To prevent overheating, use a thermometer or check the temperature by touching the outside of the pitcher (just don’t touch the steam wand). Properly frothed milk should have a silky, velvety texture and no hint of burnt or caramelized odors.
What mistakes should I avoid when frothing milk for microfoam?
To create smooth, velvety microfoam, steer clear of these common pitfalls:
- Adding air too quickly: Rushing this step leads to large, uneven bubbles instead of the fine, creamy texture microfoam requires. Introduce air gradually during the aeration process.
- Improper steam wand placement: Positioning the wand too close to the milk's surface causes excessive foaming, while placing it too deep prevents proper aeration. Aim to keep the wand just below the surface for optimal results.
- Overheating the milk: Milk heated above 150°F can lose its proteins, resulting in a burnt flavor and lackluster texture. A thermometer can help you keep the temperature in check.
For the creamiest texture, stick to fresh, whole milk. Make sure your equipment is spotless - any residue can impact the foam's quality. With careful technique and attention to detail, you’ll master the art of perfect microfoam every time!