
Coffee tools last longer and perform better when stored properly. Protect them from air, moisture, heat, and light to avoid oil buildup, rust, and odors. Clean and dry tools thoroughly before storing to prevent damage and maintain brewing quality.
Key tips:
- Clean regularly: Remove coffee oils and residue from grinders, kettles, and brewing tools.
- Dry completely: Moisture leads to rust and mold. Use microfiber towels and air-dry parts.
- Organize smartly: Use drawer dividers, magnetic strips, or rolling carts for accessible storage.
- Use proper containers: Store coffee beans in airtight, opaque canisters to preserve freshness.
For small kitchens, maximize space with wall-mounted racks, tiered trays, or portable carts. A well-organized setup not only keeps your tools safe but also improves your brewing experience.
My COFFEE WORKBENCH - Organized, Mobile, & Delicious
sbb-itb-ed7145d
How to Prepare Coffee Tools for Storage
Keeping your coffee tools clean isn’t just about appearances - it’s crucial for preventing oil buildup and avoiding motor damage [4][5]. As Steve Rhinehart from Prima Coffee wisely says:
A grimy grinder can lead straight to a hot cup of disappointment [4].
Cleaning Grinders, Frothers, and Kettles
Start by unplugging all electrical equipment to ensure safety [4][5]. For grinders, use a soft brush or wooden toothpicks to clear out coffee dust from the burrs and chutes. This hidden debris can accumulate over time and may cause mechanical problems [4]. Remove the hoppers and grounds catchers, then wash them with warm, soapy water. Make sure everything is completely dry before putting the parts back together [5].
If you’re dealing with stubborn oils, try using Urnex Grindz pellets. These are designed to clean without requiring you to take the grinder apart [4]. Avoid using regular rice - it’s too hard, can strain the motor, and leaves behind starchy residue that can clog internal parts [4]. After cleaning, grind 10–20 grams of coffee to re-season the burrs. This creates a thin protective layer that helps guard against oxidation [4]. For best results, consider doing a full teardown and deep clean about once a month [4].
Cleaning Brewing Equipment
Brewing tools like pour-over cones, French presses, and kettles need regular attention too. Descale your kettles to remove mineral deposits that can interfere with performance over time. Wash brewing components with warm, soapy water and use a brush to get into crevices [5]. Michael Phillips, Director of Training at Blue Bottle Coffee, makes an important point:
Coffee is like a sponge: Once it's been processed, it's dry, coarse, and absorbent [2].
This means any residue left behind can soak up unwanted flavors, impacting your next cup. After cleaning, double-check each tool for moisture or leftover residue before storing it.
Drying and Checking Tools Before Storage
Moisture is the biggest enemy when storing coffee tools. Use a microfiber towel to dry every part thoroughly, and let them air out in a well-ventilated space [5]. Before storing, inspect your tools carefully for lingering coffee oils or soap residue. These can harden over time, especially during storage. Disassemble parts like upper burrs and gaskets to ensure no hidden moisture remains that air drying might miss [5].
Storage Solutions for Coffee Tools
Once your coffee tools are clean and dry, the next step is figuring out the best way to store them. The right approach depends on how much counter space you have, which tools you use daily, and whether you prefer your gear on display or neatly tucked away. Start small - organize your smaller accessories before tackling the larger equipment.
Storing Small Brewing Accessories
When it comes to smaller items like electric milk frothers, scales, filters, and scoops, drawer dividers are a lifesaver. They keep everything organized, prevent tools from sliding around, and protect them from damage [6][8]. Before buying dividers, measure your drawer dimensions to ensure a proper fit [6]. Opt for a sturdy, multi-compartment organizer to keep things secure.
For tools you use often, consider mounting magnetic strips or using adhesive hooks to keep metal items within easy reach [6]. If you're short on space, tiered trays or shelf risers can double your storage capacity inside cabinets or on countertops, making it easier to grab what you need [6][7].
Storing Grinders, Kettles, and Large Equipment
Bulky items like grinders and kettles can quickly take over your counter. To save space, focus on vertical and hidden storage solutions. Floating shelves, sliding trays, pegboards, or rolling carts are great options for keeping larger tools organized and accessible [6][8]. Floating shelves and wall-mounted racks, for instance, free up valuable workspace below while keeping your equipment within arm’s reach [6][8].
For kitchens with low-hanging cabinets, sliding appliance trays are a clever way to store heavy machines. These trays let you slide equipment out only when you need it, saving both space and effort [8].
If you want a customizable option, pegboards are perfect for hanging items like drippers, mugs, and portafilters [6]. And for maximum flexibility, rolling carts or utility trolleys can act as movable coffee stations, fitting seamlessly into any kitchen layout [6].
Functional Storage That Fits Your Kitchen Style
Your storage solutions can be practical and stylish. Open shelving and wall grids are ideal for displaying beautiful tools like a Chemex or a copper kettle, transforming your coffee gear into part of your kitchen decor [10][12]. If you prefer a cleaner, minimalist look, appliance garages with pocket doors can hide the clutter while keeping everything easily accessible [10][12].
Creating a designated "caffeination station" can make your morning routine smoother and your kitchen more organized [8][11]. Grouping all your brewing tools and accessories in one area reduces clutter and keeps everything you need in one spot. Plus, this setup helps protect your gear from potential damage. Pair this approach with airtight, opaque canisters for storing beans to maintain their freshness. As Michael Phillips, Director of Training at Blue Bottle Coffee, explains:
The two primary enemies to coffee freshness are oxygen and light. The same two things that give us life take it away from coffee, ironically enough [2].
For preserving freshness, coffee professionals often recommend the Fellow Atmos Vacuum Canister ($40.00) and the Airscape Classic Coffee Storage Canister ($32.00–$36.00) [9][1]. These options not only keep your beans fresh but also fit seamlessly into an organized coffee setup.
Storage Ideas for Small Kitchens
When working with a small kitchen, every inch counts. To make the most of your space, think vertically, use hidden nooks, and consider portable solutions that keep things organized and accessible.
Under-Counter and Wall-Mounted Options
One of the easiest ways to free up counter space is by using wall-mounted rails and hooks. Systems like IKEA's KUNGSFORS or HULTARP (priced at $7.99 for a 23½" rail) offer a convenient way to hang handheld milk frothers, spoons, and mugs with S-hooks and containers, keeping everything within arm's reach [12]. For metal tools like frothing pitchers or tampers, magnetic strips are a great alternative - repurposing a magnetic knife rack works perfectly [12].
Inside cabinets, clip-on wire baskets make use of vertical space. For example, IKEA’s PÅLYCKE ($8.99) slides onto shelves to store items like filters or pods without taking up valuable shelf space [12][13]. You can also attach small racks or adhesive hooks to cabinet doors for items such as measuring spoons or small baskets [13].
For a more customizable option, try pegboards. These allow you to adjust hooks and shelves as your coffee setup changes over time [7][14]. Another clever idea? Use magnetic jars on the side of your fridge to store coffee beans or tea, freeing up shelf space [13].
Portable Coffee Carts and Stations
If wall or counter space is tight, a rolling cart can be a lifesaver. These portable stations are easy to move around and can be tucked into narrow gaps when not in use [15][16]. Look for slim designs, around 11–12 inches wide, to create a dedicated brewing area without taking up too much room [15].
Multi-tiered carts are especially handy, as they make use of vertical space. You can store your coffee maker, mugs, and supplies all in one place [15][17]. For added convenience, choose carts with side handles or guardrails to keep items secure during transport, and make sure they have lockable wheels for stability while brewing [15]. To keep the cart steady, place heavier items like coffee beans or water carafes on the bottom shelves [16].
Multi-Purpose Storage Containers
In small kitchens, storage solutions that serve multiple purposes are key. For example, pod storage drawers can double as a base for your coffee machine while holding 36–60 pods underneath, saving both counter and vertical space [7]. Similarly, multi-compartment caddies are perfect for organizing stirrers, sugar packets, cups, and creamers in one compact area [7].
For syrups and flavorings, tiered racks like the THYGIFTREE 3-Tier Syrup Rack ($24.99) make the most of narrow counters [7]. Meanwhile, Lazy Susans are excellent for deep cabinets or awkward corner spaces, offering easy access to condiments and tools. The Farmhouse Oak 9" Lazy Susan ($14.44) fits neatly into tight spots while keeping everything organized [18][7].
Even knockboxes can pull double duty, collecting used espresso grounds while also acting as a countertop organizer [14]. When choosing storage containers, go for stackable designs to maximize vertical space and keep your setup neat [18].
Keeping Your Storage System Organized
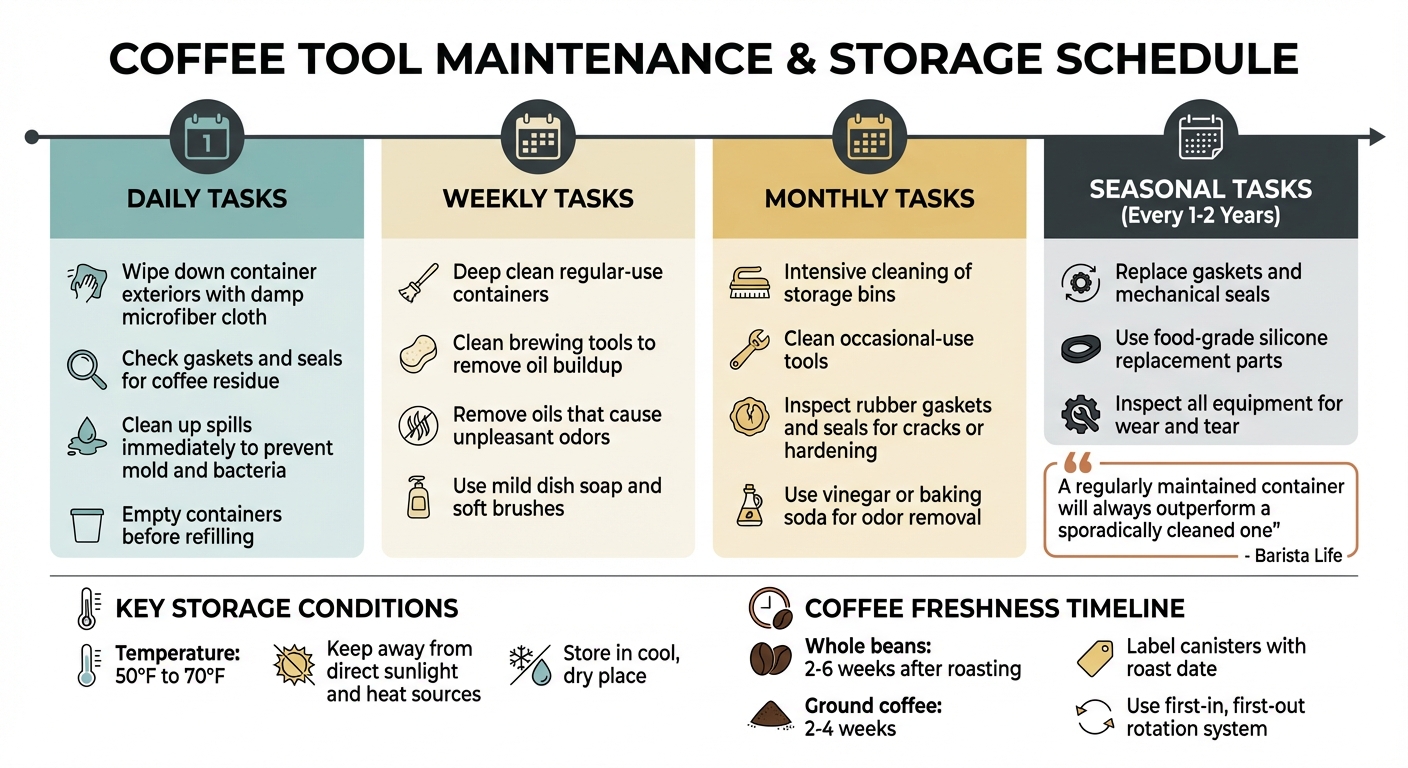
Coffee Tool Maintenance Schedule: Daily, Weekly, Monthly, and Seasonal Tasks
Once your coffee tool storage is set up, the real challenge lies in maintaining that order. By developing consistent habits, you can keep clutter at bay and ensure your tools stay in top shape. Regular organization not only makes your setup more efficient but also helps extend the life of your tools.
Labeling and Rotating Tools
Proper labeling can make a big difference. Mark canisters with the coffee type and roast date. Why? Because coffee beans stay fresh for about 2 to 6 weeks after roasting, while ground coffee only lasts 2 to 4 weeks [3]. By noting these dates, you can follow a first-in, first-out system to use older beans before they lose their freshness [19].
Give each tool a designated spot. Use dividers to keep everything in place, and for items you use often, like mugs or syrups, consider coffee accessories like tiered trays. Place the most frequently used items on top and smaller tools or flavorings on lower levels [8].
Pair this organization with a consistent cleaning routine to maintain both order and hygiene.
Regular Cleaning Schedule
A clean storage system is an efficient one. Stick to a regular cleaning schedule that includes daily, weekly, and monthly tasks. For daily upkeep, take just a minute to wipe down the exterior of your containers and coffee station with a damp microfiber cloth. While you’re at it, check gaskets and seals for any coffee residue [19].
Weekly deep cleaning should focus on the containers and tools you use regularly. This removes oils that can build up and cause unpleasant odors [19]. Monthly, dedicate time to thoroughly clean storage bins and tools you use less often. Inspect rubber gaskets and seals every few months for cracks or hardening, and plan to replace them every 1 to 2 years to keep your containers airtight [19]. As Barista Life puts it:
A regularly maintained container will always outperform a sporadically cleaned one [19].
Here’s a quick breakdown of cleaning tasks:
| Cleaning Frequency | Tasks | Tools Needed |
|---|---|---|
| Daily | Wipe exteriors, check seals, empty containers before refilling | Damp microfiber cloth |
| Weekly | Deep clean regular-use containers and brewing tools | Mild dish soap, soft brushes |
| Monthly | Intensive cleaning of storage bins and occasional tools | Vinegar or baking soda for odors |
| Seasonal | Inspect and/or replace gaskets and mechanical seals | Food-grade silicone, replacement parts |
Don’t forget to clean up spills right away to avoid mold and bacteria [19]. Also, store your coffee tools in a cool, dry place with temperatures between 50°F and 70°F, away from direct sunlight or heat sources [1]. Keeping everything clean and well-organized isn’t just practical - it’s essential for preserving the quality of your coffee experience.
Conclusion
Taking care of your coffee tools isn’t just about keeping your kitchen tidy - it’s about protecting your investment and ensuring every cup of coffee tastes as good as it should. Storing your equipment properly - away from air, moisture, heat, and light - helps prevent rancid oil buildup that can not only ruin the flavor of your brew but also harm your gear over time[20].
The good news? You don’t need a complete kitchen makeover to see results. Simple steps like transferring beans into vacuum-sealed containers, assigning each tool a specific spot, and dedicating just five minutes a week to cleaning can make all the difference[20].
Whether you’re working with a large pantry or a small apartment kitchen, the same principles apply. Keep your tools clean, dry, and organized, and protect them from conditions that lead to wear and tear. By weaving these habits into your daily routine, you’ll enjoy consistent performance from your equipment and ensure it lasts for years to come.
FAQs
How do I keep my coffee tools from rusting in storage?
To keep rust at bay, it’s essential to clean and dry your coffee tools completely after every use. Any leftover moisture can cause corrosion over time. Use a lint-free cloth to wipe down items like grinders, tampers, and French press parts, ensuring they’re fully dry before putting them away.
Store your tools in a cool, dry spot with low humidity - like a kitchen cabinet away from heat sources. To go the extra mile, you can add silica gel packets or similar moisture absorbers to maintain a dry environment. For metal surfaces, applying a light coat of food-grade mineral oil can act as a barrier against moisture and help prevent rust.
Opting for high-quality, rust-resistant materials, such as stainless steel, is another smart move. For example, Fwing Coffee offers premium stainless-steel tools that are built to handle daily use without rusting, making them a dependable choice for coffee lovers.
What are the best ways to store coffee tools and beans in a small kitchen?
For small kitchens, keeping coffee tools and beans organized comes down to smart storage solutions. Start with compact, airtight containers. Opt for stainless steel or dark glass containers with tight seals to shield your coffee from light, oxygen, heat, and moisture. These containers are easy to tuck onto a shelf, into a drawer, or even on a slim countertop. If you're looking to extend freshness, vacuum-sealed canisters are a fantastic choice - they remove air to lock in flavor while staying space-friendly.
To make the most of limited room, go for stackable or slim-profile designs. Think narrow cylindrical canisters or modular jars that let you build upward instead of spreading out. Combine these with clever organizers like a drawer insert or a magnetic strip to keep tools like scoops and tampers within reach without adding clutter.
For a great example, Fwing Coffee offers premium airtight canisters that are perfect for small spaces. Their slim, vacuum-sealed designs not only keep your coffee fresh but also fit neatly into tight spots - ideal for home brewers with limited kitchen real estate.
Why should I clean my coffee tools before storing them?
Keeping your coffee tools clean before storing them is essential for maintaining their performance and extending their lifespan. Over time, coffee oils and fine particles can accumulate, leading to unpleasant, rancid flavors that can ruin your next brew. Regular cleaning ensures your equipment is free from this residue, so every cup starts with a fresh, clean slate.
Clean tools also help protect against moisture and bacteria, which can cause long-term damage. Taking care of your gear - whether it’s a grinder, frother, or your favorite mug - keeps them in top condition, ensuring they remain dependable and look their best for years to come.